Supplies:
Mason Jar (or similar jar)
Rusty Tin Lid (or other lid)
Electric Candle Light
Drill and Glass Drill Bit
E6000 Glue
Bushing (Optional)
Step One: Stuff Jar with Newspaper for added support and line sink with a towel...Mark on the jar where you want your hole, being careful not to mark it too close to the bottom of the jar. You can place a piece of tape over the mark to help hold the drill bit in place while you begin drilling the hole. As you are drilling let water from the faucet flow over the hole (just a drip drip drip will do!) This keeps the jar and drill bit cool and helps keep it from cracking. DO NOT PUSH on the drill...let it do the work!
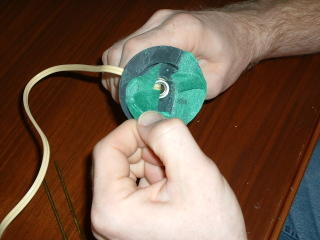
Step Two: ...First plug your candle in and make sure it works and then remove the light bulb. Now make sure your candle will fit down into your jar as you may have to sand some of the base off (see helpful hints!) If your electric candle lamp has a green felt covering over the bottom remove it.

Next use a screwdriver or other type instrument (My hubby has bent a wire coat hanger to use) and push it up into the shaft of the candle lamp and pop out the socket inside.
Step Three: Pop off the covering of the socket (not that I'm recommending this, but Hubby has to use his teeth...I prefer a flat head screwdriver to pry it off!) and expose the electric connection and remove the cord from the connector.
You can insert your bushing into the hole in the jar if you're using one. Thread the cord through the hole in the back of the jar and out through the top of the jar opening.
Thread the cord back through the base of the candle and into the shaft and place cord connections back into the socket.
Snap the cover back on. Now replace the bulb and check to be sure the light works (if not then check the connections-make sure the wires are touching the conductors inside the socket!)
Step Four: Push the shaft back onto the base. Using the E6000 glue put a bit around the rim of the base of the candle lamp and push it back into the jar, pressing the base firmly against the bottom of the jar. The E6000 glue dries fairly quickly so be sure your light is where you want it! (Centered in the jar and not off to the side)

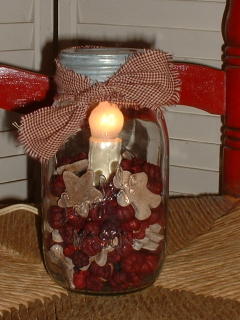
Step Five: Now you can fill your jar with scented fixins, potpourri or whatever you'd like!

Some Helpful Tips:
*Some folks find it works better to put the lid on the jar while they are drilling to add more stabilization to the jar.
*Using Wide Mouth Mason Jars is the easiest...but if your using any other type you may have to file the base of the candle lamp down to make sure it fits into the jar. I use a dremel but any type of sander will work or you can even use a knife to "shave" a bit of the base away. (your fixins will cover it!) Make sure your candle lamp is not too tall for your jar. I use the 2.5 inch for quart mason jars and either 3.5 or 4.5 for the gallon size.
WHERE TO BUY:
Mason Jars: You can find these at most Walmarts during canning season. They also carry them at Ace or True Value Hardware (or you can log onto www.acehardware.com and order them online...they can deliver them to your local Ace or True Value Hardware store for FREE!) I've picked up quite a few from yard sales, flea markets and thrift stores!
Electric Candle Lights: Since I have a tax ID, I order mine from www.craftwholesalers.com but you can find them at www.factorydirectcrafts.com or at your local Michaels or ACMoore...they sometimes have them at Joanns Fabrics or at Walmart close to Christmas!
E6000 Glue: You can find this at Walmart in the craft section or at Michaels also!
Glass Drill Bits and Bushings: I get mine from Lowes or Home Depot in the tool section with the other drill bits. Make sure it says for GLASS!! If you're not sure ask one of the sales associates! Supposedly, the diamond bits last longer than the carbide ones but I haven't seen a difference and for the price I'll take the carbide ones! You'll need to replace it after doing a couple cases of jars...You'll be able to feel when it needs to be replaced! The bushings can usually be found with electrical supplies but ask as they tend to put them with the screws and such also!
Rusty Lids: There are a number of places to get these including www.factorydirectcrafts.com and www.rustytin.com

1 comment:
Thanks for the tips on how to make those jar lamps. I've always wanted one and now I'm going to get hubby to make one for me. LOL Thanks again. Great blog by the way.
Taracotta
Post a Comment