
Supplies:
Shipping Tags (Whichever size you choose-You can find these at your local Office Supply Store)
Instant Coffee or Walnut Ink
Vanilla (optional)
Candle oil (Optional)
Stamps, Pens, Pictures (You'll need modge podge for the pictures)
These are really simple to make and add a great accent to your crafts!
First you'll need to mix your coffee stain. I take one cup of HOT water and add in 3 HEAPING tablespoons of instant coffee. (You can add a few drops of the vanilla if you would like) I put it into a spray bottle but you can also pour it into a shallow cookie sheet that has a lip around the edge and soak them or use a sponge brush to apply it.
Once you've stained your tags, place them on a dry cookie sheet in the oven on LOW until they dry out. If they are not dark enough then you can spray them again until you achieve the look you want.
To use the walnut ink, mix one teaspoon of granules (more or less depending on your preference) with 1 cup of HOT water. Stir until the crystals have dissolved. I would recommend using a sponge brush to apply this mixture to your tags. You can let them air dry or put them in the oven on low. If the little hole reinforcer falls off just glue it back on once it's dry. If your tags have curled up you can use an iron set on cotton setting to iron them out. I would use a pressing cloth or a small washrag over the tag and then iron on top of that.
Once they are dry, use your stamps to stamp a special message or a sharpie marker to write a neat saying. You can print out vintage pictures and modge podge them onto the tag. If the pictures are too bright on the stained tag stir a bit of the coffee mixture into the modge podge first. Try adding some pizzazz with glass glitter or mica flakes. You can embellish them with buttons, stickers, or rickrack. Check out the scrapbook section of your local craft store for lots of different ideas. You can also use different things in place of the strings-raffia, jute, or strips of homespun.
To add scent to your tags, I use 1 oz candle oil to 3 oz distilled water and put it into a spray bottle. Spritz the tags on the back and they'll smell terrific! Some folks add the oil to their coffee or ink mixture but to me it smells strongest when applied this way.
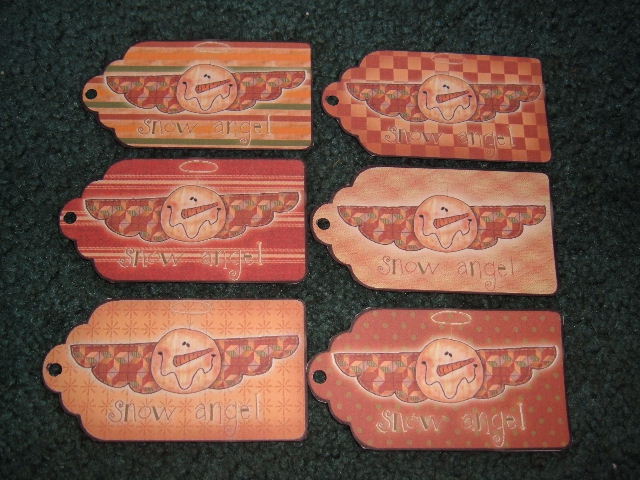
There is also another way to do tags and that is to print them out with the graphics already done. Terri from www.pumpkin-seed-primitives.com has done some this way with graphics from her CD.
Here are some handprinted tags from Erin of www.whimsicalprincess.com

Erin has also offered this tip:
Because electricity is so expensive here in Canada, when we have a beautiful, hot sunny day I antique my tags in coffee and vanilla like everyone else (the hotter the water the better, it tends to get to the fibers in the tags better) I then use old screen doors to put my tags on. (I am usually doing 200-500 at a time) I leave them out in the sun and let Mother Nature do it's thing, as they start to dry you can re-dip to make darker.
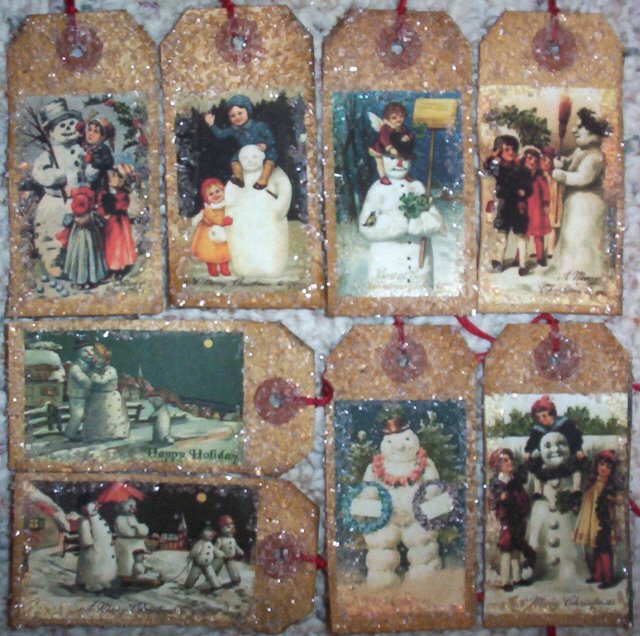
Here is another example of tags made by Stacey of www.primprimitives.com Stacey sells most of her tags on ebay under user name abigailes_mommy. She uses vintage pictures and embellishes her tags with glass glitter.
I am including some links for tags that are ready to print and also a blank template to make your own tags.
With the template, I use my print program, add graphics and then print out on Kraft Colored cardstock. You can use regular colored cardstock and coffee stain it first to print out the tags on, too.
Here are some free tags from www.primmart.com
http://www.primmart.com/FREEPrimitiveTags.html
http://www.primdoodles.com/printables6.asp
Here is a template courtesy of Cheryl at www.raggedyscrappin.com
http://www.raggedyscrappin.com/store/piclink.asp?pageID=freetemplates
No comments:
Post a Comment