Thursday, December 15, 2005

HANDMADE GRUBBY TAGS

Handmade Grubby Grungy Aged Tags


Supplies:
Shipping Tags (Whichever size you choose-You can find these at your local Office Supply Store)
Instant Coffee or Walnut Ink
Vanilla (optional)
Candle oil (Optional)
Stamps, Pens, Pictures (You'll need modge podge for the pictures)

These are really simple to make and add a great accent to your crafts!


First you'll need to mix your coffee stain. I take one cup of HOT water and add in 3 HEAPING tablespoons of instant coffee. (You can add a few drops of the vanilla if you would like) I put it into a spray bottle but you can also pour it into a shallow cookie sheet that has a lip around the edge and soak them or use a sponge brush to apply it.
Once you've stained your tags, place them on a dry cookie sheet in the oven on LOW until they dry out. If they are not dark enough then you can spray them again until you achieve the look you want.
To use the walnut ink, mix one teaspoon of granules (more or less depending on your preference) with 1 cup of HOT water. Stir until the crystals have dissolved. I would recommend using a sponge brush to apply this mixture to your tags. You can let them air dry or put them in the oven on low. If the little hole reinforcer falls off just glue it back on once it's dry. If your tags have curled up you can use an iron set on cotton setting to iron them out. I would use a pressing cloth or a small washrag over the tag and then iron on top of that.
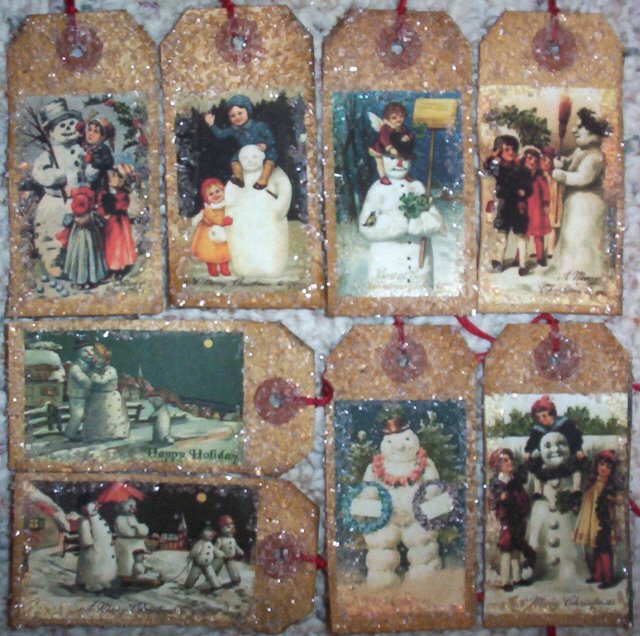
Once they are dry, use your stamps to stamp a special message or a sharpie marker to write a neat saying. You can print out vintage pictures and modge podge them onto the tag. If the pictures are too bright on the stained tag stir a bit of the coffee mixture into the modge podge first. Try adding some pizzazz with glass glitter or mica flakes. You can embellish them with buttons, stickers, or rickrack. Check out the scrapbook section of your local craft store for lots of different ideas. You can also use different things in place of the strings-raffia, jute, or strips of homespun.
To add scent to your tags, I use 1 oz candle oil to 3 oz distilled water and put it into a spray bottle. Spritz the tags on the back and they'll smell terrific! Some folks add the oil to their coffee or ink mixture but to me it smells strongest when applied this way.

There is also another way to do tags and that is to print them out with the graphics already done. Terri from www.pumpkin-seed-primitives.com has done some this way with graphics from her CD.


Here are some handprinted tags from Erin of www.whimsicalprincess.com


Erin has also offered this tip:
Because electricity is so expensive here in Canada, when we have a beautiful, hot sunny day I antique my tags in coffee and vanilla like everyone else (the hotter the water the better, it tends to get to the fibers in the tags better) I then use old screen doors to put my tags on. (I am usually doing 200-500 at a time) I leave them out in the sun and let Mother Nature do it's thing, as they start to dry you can re-dip to make darker.


Here is another example of tags made by Stacey of www.primprimitives.com Stacey sells most of her tags on ebay under user name abigailes_mommy. She uses vintage pictures and embellishes her tags with glass glitter.


I am including some links for tags that are ready to print and also a blank template to make your own tags.
With the template, I use my print program, add graphics and then print out on Kraft Colored cardstock. You can use regular colored cardstock and coffee stain it first to print out the tags on, too.

Here are some free tags from www.primmart.com
http://www.primmart.com/FREEPrimitiveTags.html
http://www.primdoodles.com/printables6.asp

Here is a template courtesy of Cheryl at www.raggedyscrappin.com
http://www.raggedyscrappin.com/store/piclink.asp?pageID=freetemplates

Wednesday, October 19, 2005

PRIMITIVE SNOWBALLS

SNOWBALLS


Supplies:
Foam Balls (any size you want)
Joint Compound (Can be found at Walmart over in the hardware section)
Mica Flakes, Glass Glitter or regular glitter
ModgePodge

I grew up in Florida and now live in North Carolina-I prefer these kinda snowballs to the real thing anyday!!

There are a few ways to do this...
*You can roll the balls in the mica/glitter while the joint compound is still wet...I'd wait until the compound "sets up" a bit before trying it that way tho!
*You can skip the joint compound and just use modge podge and roll the ball in the mica.

This is the way that I do them...
-SQUEEZE your foam balls or roll them on the counter to "compact" them-you don't HAVE to do this but I like to get my stress out!! HA HA!
-Open your joint compound and STIR STIR STIR! Get your hands dirty...use your hands and fingers to press the compound onto the foam-doesn't have to be even or "pretty"! A little tip is to let the joint compound sit for a little while to harden a bit-maybe 30 minutes. It can be pretty slushy otherwise. I just set the balls on some aluminum foil on my counter.


-Let dry overnight.

-You can elect to sand them a bit or use them as is!...In the pic you can see the difference in them.Use 150 grit sandpaper and sand them lightly. My suggestion is to dampen your hands a bit and rub them over the balls first. Sanding joint compound get VERY dusty and the little bit of moisture helps with that...Otherwise I'd advise wearing a mask or something similar over your mouth and nose and sand them OUTSIDE! (Remember it's dusty-Don't wanna have to clean anymore than we have to right??)
THE SANDED ONES ARE ON THE LEFT

-Once they are sanded, dust them off. Lay some aluminum foil or parchment paper down on your work surface. Dump some Mica Flakes into a plastic bowl. Using a sponge brush, coat your ball with modgepodge then roll the ball in the mica flakes. I hold the bowl and "swirl" it around. Take it out and set it on your work surface to dry!


WAH-LAH...SNOWBALLS!!

Lots of uses for these...use the smaller balls to fill up a mason jar or put in with some wintertime potpourri or fixins. Decorate a sewing drawer or cheese box light, add to a wood bowl or basket with some greenery or pip berries. Set them on a shelf with some of your snowman collectibles! They are a great addition to your winter decorating!

Monday, October 17, 2005

ALL ABOUT CINNAMON DOUGH

CINNAMON DOUGH

It's getting close to Christmas!! (I can hear you all groaning now!) Seems like it comes earlier and earlier every year! There are lots of things I LOVE about the season though and one of the biggest is passing down traditions and starting our own with the kids!
One of our traditions is making handmade ornaments each year. The kids have come up with some fun ideas-like the year we took all those mismatched socks (Like the lost ones the washer eats!) and tea dyed them and hung them on the tree with mini clothes pins! We've done beading ornaments, paper ornaments, filled plastic ornaments, painted ornaments, but the one my kids love to do EVERY year is making cinnamon dough ornaments!!
There are TONS of recipes out there for this type of dough-I wanted to provide you with some links and some ideas for these, too! (Just a reminder-make sure you put a hole in the ornament before you bake or air dry them! We had lots of "bowls" of ornaments one year as we forgot that one step!)

This first recipe is one that I use quite a bit. For Christmas, we make some gingerbread ornies and put each one in a bag with a topper with the recipe and send them in with my kids for their classmates! Nothing better than passing a tradition on to another family!

GINGERBREAD DOUGH ORNAMENTS

3 TBS. SHORTENING 3/4 CUP WATER
1/2 CUP MOLASSES 3 1/2 CUPS FLOUR
1/2 CUP SUGAR 1 TSP. BAKING SODA
1 TSP EACH GROUND CLOVES, CINNAMON AND
GINGER
PREHEAT OVEN TO 350 DEGREES
BEAT SHORTENING AND SUGAR TOGETHER UNTIL LIGHT AND FLUFFY. STIR IN MOLASSES. SIFT THE DRY INGREDIENTS TOGETHER. STIR THEM INTO SHORTENING MIXTURE IN 3 PARTS ALTERNATING WITH A 1/4 CUP OF WATER EACH TIME. DOUGH WILL BE STIFF.
USE CINNAMON TO DUST COUNTERTOP AND ROLL OUT DOUGH TO ABOUT 1/4 INCH THICKNESS...USE COOKIE CUTTERS TO CUT OUT YOUR SHAPES. USE A STRAW TO POKE A HOLE FOR HANGING. COOK ON A COOKIE SHEET FOR 20 MIN. THEN TURN OFF OVEN AND LET COOL IN OVEN-YOU MAY NEED TO FLIP THESE A FEW TIMES. LET COOKIES AIR DRY FOR A DAY OR SO. YOU CAN PAINT THESE WITH ACRYLIC PAINT SEAL THE FRONT (SO YOU CAN STILL SMELL THE BACKS!) WITH MODGE PODGE OR POLYURETHANE SEALER OR (LET MOM OR DAD) DIP INTO MELTED CANDLE WAX TO SEAL AND SCENT.
*If you want a lighter colored gingerman, substitute LIGHT CORN SYRUP for the MOLASSES or go half and half. You can also use WHEAT FLOUR for a different look! If you want some PUFFY ornaments, substitute 1/2 the regular flour with self rising flour!

This second recipe is from Wendy at Simply Cute Crafts...She is in the process of adding more craft projects to her sight but check out her ADORABLE diaper cakes! www.simplycutediapercakes.com

2 Cups Flour
1 Cup Salt (I use Kosher for a coarser look)
1/2 Cup Cinnamon
1 TBS Corn Starch
3/4 to 1 Cup Warm Water
Fragrance Oil (Optional)

I sift all of the dry ingredients together and then add the warm water a little at a time until you get the right consistency. If it's too sticky - add a little more flour. If it's crumbly - add a little more water.
Knead for about 5-10 minutes until dough is smooth......if using Kosher salt it won't feel completely smooth. Then let is sit for about 30 minutes.....either in a zip loc bag or plastic container with a lid. You can let it sit on the counter top or the fridge. Then roll out to desired thickness 1/4 to 3/4 and start cookie cutting away or use a sharp knife and do them freehand.....that's how I do my stars, moons and kitties!
Now I let mine dry on a cookie sheet and flip them about twice a day. Now you can dry them in the oven at a low temp 150 degrees or air dry them.
It usually take about 3-4 days to air dry, but can take longer depending on the thickness of the ornie.
You can wax dip them or I use Modge Podge Glossy and Brush that all over them to give them a glossy waxy look.


Twigs of Twigs & Sprigs has a great recipe on her sight
http://twigs-n-sprigs.safeshopper.com/133/cat133.htm?981

Susan of Simple Kneads has a recipe on her sight but she also sells a mix that you just add wet ingredients to-check our her sight for TONS of great ideas and patterns!http://www.simplecountrypleasures.com/tipsnhints1.htm Susan's dough smells like cinnamon powder or sticks!

Rochelle from CinnaMinnies also sells her mix from her sight. She also sells kits that include her Cinnamon Clay, oil and a cookie cutter along with her tips and hints! Rochelle's dough is a SPICY cinnamon (think Red Hots)!!
http://www.cinna-minnies.com/

Here are links to some other recipes with some great ideas in there, too:
http://www.kidsdomain.com/craft/dough2.html
http://cookie.allrecipes.com/az/NonEdibleGingerbreadMen.asp
http://boards.hgtv.com/groupee/forums/a/tpc/f/4004031632/m/5021081042
http://www.razzledazzlerecipes.com/christmasfun/kids.htm
http://www.recipegoldmine.com/crafts/crafts42.html

I like to use mini cookie cutters to cut out small versions of trees, hearts, stars, angels, gingers etc...and then I add them to potpourri or I put them in a mason jar! There are TONS of ideas that you can make besides ornaments!

Another dough that I like to use is Salt Dough. Here is a great site with a recipe and lots of ideas! http://www.multihobbies.com/saltdough/index.htm
You can vary this recipe by using wheat flour and adding cinnamon or ground cloves to it. I find that if I dissolve the salt in hot water first it helps it have a smoother texture! If you want puffier ornaments substitute half the regular flour with SELF RISING flour. You can use some modge podge or polyurethane to seal these or you can dip them in scented wax.

Wednesday, October 05, 2005

DOLL MAKING 101

Doll Making 101

The tools of the trade:
Sewing machine (obviously!) & sewing supplies (Quality thread, seam ripper, pins etc.)
Muslin
Fabric for dress, pantaloons, apron, slip etc....
Stuffing (and a pencil, chopstick, wooden spoon handle, dowel etc. help stuff)
Embroidery thread, yarn, wool etc. (for hair)
Doll making needle (I like the 5" ones-looks like a regular needle-just MUCH longer)
Buttons (for eyes or for decoration)
Barn Red paint or regular powder blush & a brush (for cheeks!)
Paint for shoes
Fine grain sand paper

OPTIONAL:
Kitty Litter, Poly Pellets etc. for weighting your dolls
Accessories-Flags, baskets, rusty keys, etc. to "customize" your doll
Candle Oil for scenting (see Recipe at end of article)
Turning Tubes or hemostats for turning
Tea or Coffee for staining


SOME THINGS TO REMEMBER:
*If you are not an experienced doll maker-buy some patterns! There are a TON of dollmakers out there who make easy to follow patterns that are chock full of diagrams and tips! This is a great way to learn shortcuts, to learn new techniques and to try different types of designs!
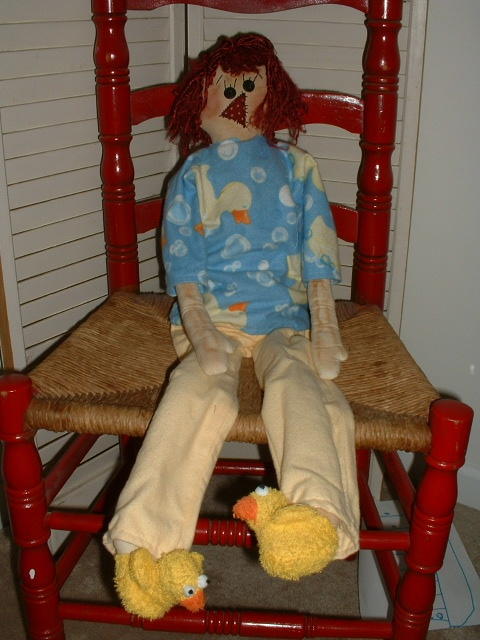
*Remember that you are just starting off...I am showing you a picture of my very first doll-no laughing now! 3 years later-I am designing my OWN dolls!
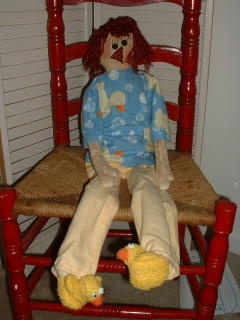

*Sewing dollies takes time-so TAKE YOUR TIME! I used to line my dolls up and make them assembly line fashion-suddenly the dolls started looking ALIKE! I wanted UNIQUE dolls so I started concentrating on doing one at a time!
*Some folks like their dolls to have a "theme"...Your fabric can inspire you-red, white & blue fabric for a patriotic doll, reproduction feed sacks for a mammy doll etc. Don't forget the accessories! A flag, a basket, an animal etc.
*When I first started out I used the cheapest Muslin that I could find-and that worked O.K.! Then I started trying different types and now I use the muslin that is already TeaStained. You can find this right next to the other muslin at Walmart or Joanns or other fabric stores. I use it because it has a tighter weave and doesn't unravel, tear or pucker as easily! It is the perfect shade for my ShabbyChic dolls but I can still stain it to make it even more prim and grubby!
*Here's a hint for epatterns...Print out the directions on regular paper but print out the pattern pieces on cardstock...Then you just have to cut them out and trace onto muslin!
*Every time that you trace a doll piece it gets BIGGER! I remember buying a doll made from one of my favorite designers and it was so much more petite than mine! But I was adding size by tracing around the original pattern pieces, then tracing that onto cardstock and then tracing the pieces onto the muslin! No wonder my doll looked like an amazon!
*You can use a variety of items for tracing your pieces-some use a mark-b-gone pen, colored pencils, carbon paper-I just use a regular No 2 pencil-slightly dull so it won't snag.

TEA OR COFFEE STAINING:
*Experiment to find the "recipe" that works for you. Remember that coffee will give a much darker look especially if you bake the doll in the oven. (Bake on the LOWEST setting for 10-15 minutes at a time-KEEP AN EYE ON THE DOLL or set the timer!)
*I usually stain a couple yards of muslin at a time but if you are going to stain your dolls individually make sure you do it before you put on the face or hair (the coffee or tea makes the hair stiff and will stain the color of the floss) and DO NOT put your doll in the oven if it has poly pellets or any other weighting material in it! Buttons may also melt in the oven!

PAINTING YOUR DOLLS:
You can use either black or brown (I like burnt umber) craft acrylic paints. You don't need to add a fabric medium to the paint. There is no need to paint the entire doll, as the clothes will cover much of it. Some folks do-some folks don't. Apply one to two coats, let dry and sand LIGHTLY using fine grain sandpaper.

ONTO THE DOLL MAKING...
*Lay your pattern pieces out on the muslin-arrange them so that you use the least amount of muslin but make sure you leave room around the pieces to cut! The traced lines will be your sew lines! Sew the pieces according to the directions-leaving open where indicated or on the fold. Some folks will double sew the neck for added stability to prevent against "blow-outs." Trim all seams to 1/4" or less-clipping your curves and corners. (you can also use pinking shears for this)
*Before you turn your body piece right side out, I recommend putting in a box seam to help your doll sit better. Match the bottom seam up with the side seam and sew across. Clip 1/4" from sew line.


*Turn all pieces right sides out-this is where the turning tubes or hemostats come in handy!
*Cut a slit through one layer of fabric on the body. If you are going to weight your doll pour in the poly pellets or use a snack size ziploc bag filled with kitty litter, sand, beans or whatever you use to weight your dolls. (The ziploc prevents moisture and bugs from invading your doll! Place stuffing around the bag and continue to stuff the body. Whipstitch the opening closed.

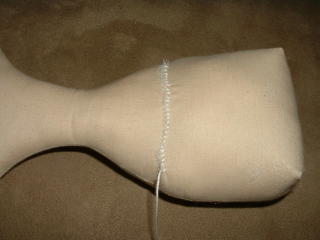

STUFFING
I like to use a wooden chopstick for stuffing my dolls...I spray the doll part lightly with warm water and use SMALL pieces of stuffing! Spraying with water will make the fabric shrink a bit and using small pieces of stuffing ensures smooth seams. Stuff only to where indicated on pattern. If your doll has a long narrow neck you can use a small dowel or chopstick to stabilize her neck. Push the chopstick up into her head and stuff around it. Make sure the chopstick extends into her chest.
*Once I have my pieces stuffed I like to paint the shoes before I attach the legs to the body. Follow the pattern diagrams. I let the paint dry and sand LIGHTLY with fine grain sandpaper. Some patterns have laces for the shoes-mark where the laces will go. I use 6 strands of embroidery floss or crochet thread.

THE FACE & HAIR
* I like to blush my doll's cheeks first-that way I won't get paint or blush all over the doll's nose and eyelashes. If you are using paint to blush the cheeks use a dry brush method. Put a small bit of paint on a paper plate and then dip a DRY stencil brush into it. Using a circular motion, dab it onto a paper towel until most of the paint is gone and it BARELY leaves a mark. Very lightly brush onto the doll's cheeks in a light back and forth motion. Remember, you can always add more but you can't take it off if you put on too much!
*I also like to do the face and hair before I attach the legs and arms. Following the pattern guidelines trace the face onto the muslin LIGHTLY. If you are using embroidery floss for the nose-use however many strands of floss the pattern indicates and your 5" doll needle. Tie a knot about 2" from the end of the floss and insert the needle in the back of the doll's neck (under the collar line) and come out at the bottom left corner of the nose. Take a stitch across the nose and back out the other side of the nose. Continue until you finish the nose and insert the needle back down THROUGH the head and out the back of the neck. Knot the threads and clip. If you are using embroidery thread for hair-this is a simple way of doing it. I like to use 6 strands. Take your needle from the front to the back on the head where indicated on pattern just below the seam, leaving a tail as long as you want the hair to be. Take the needle and go through the front of the head and back out the back, the same way you did the first time! Cut the thread the same length as the tail. Repeat until you have covered the head.

(I like to do the nose and hair before the face as it helps me to decide on the doll's expressions and size of the button's for eyes.) For the mouth, eyebrows, eyelashes and attaching the button eyes, I use one strand of black embroidery thread-tie a knot in the end like you did for the nose-enter from the back of the neck and come out on one side of the doll's smile. Backstitch the smile and on the last stitch go through the doll's head and out where one of the eyes will go. Attach the button and take the needle through the head to where the other eye will go. Attach that button coming out at the edge of the eyebrow. Take a stitch and come out where the other eyebrow begins and take a stitch. Going through the doll's head, come out where you'd like to have eyelashes. When you are finished with the eyelashes go through dollies head and out at the base of the neck. Tie off and clip. For dolls with big heads and/or long necks, I stitch HALF the mouth from the corner of the smile to the bottom. Then I do the eyes and eyebrows and lashes. I come down to the other outer corner of the mouth and stitch the last half of the smile and then back out the neck! It is a lot easier that way & you don't wind up scrunching the doll's head and neck trying to get that needle back out.

ATTACHING THE ARMS & LEGS
*To attach the arms and legs I fold the raw edge under 1/2" and whip stitch them onto the body where indicated. You don't have to fold under the raw edge-it is just the way I do it!
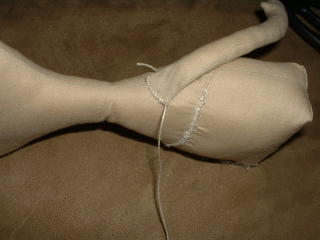
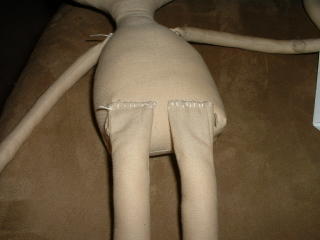

*Don't forget to sign your dolly! You can use a pigma pen (Found in the scrapbooking section) or a fine point sharpie. I sign my name, the doll's name and the date.

MAKING THE CLOTHES
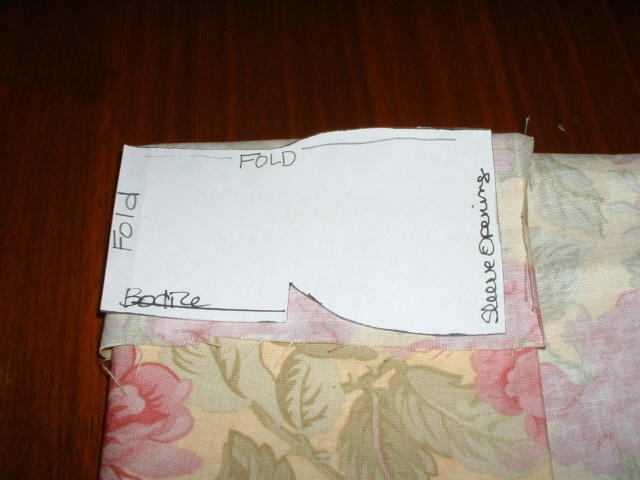
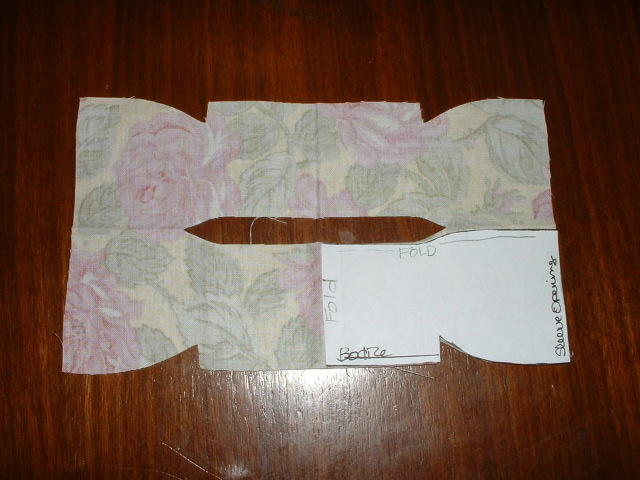
*Follow the pattern pieces for making the clothes making sure to follow any instructions for doubled material or laying pieces on the fold.
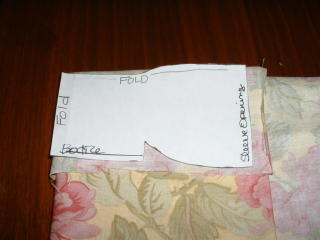
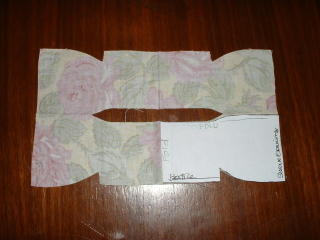

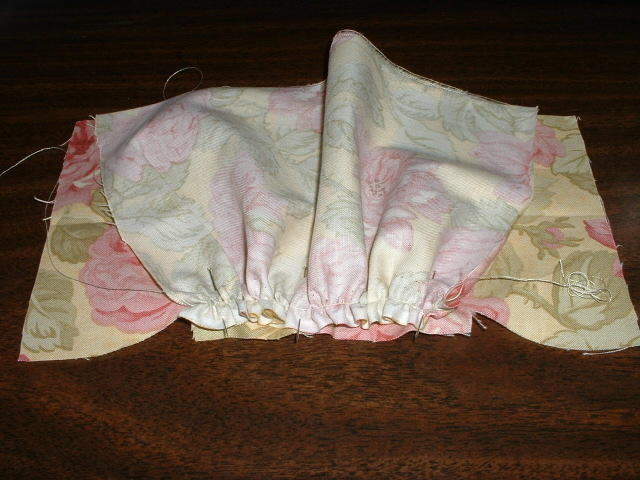
Cut or Tear the skirt piece of the dress and sew a gathering or a running stitch about 1/4" away from one long edge. Gather the skirt and with right sides together match it to the bottom of the bodice. Pin & sew right above the gathering stitch
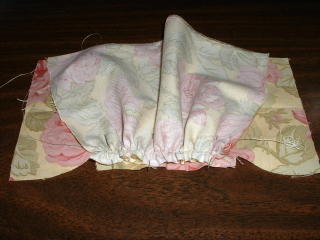
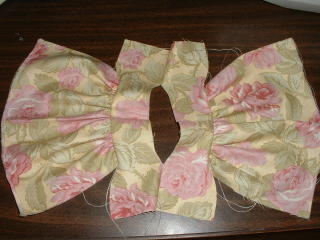

Once you have both sides done remove the gathering stitch if you can see it.
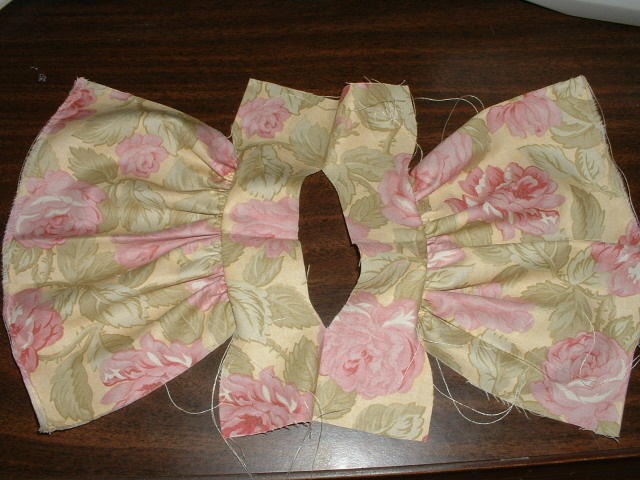
With right sides together, match the underarm seams and edges of dress and sew the bottom of the arm and down the sides of the skirt on both sides. Sew across the shoulder seams leaving open where indicated on your pattern-or if you have cut on the fold-clip an opening for the head.


*I like to put the doll's dress on feet first-especially if the doll has a big head!
*Sew a gathering or a running stitch around the neckline and around the cuffs of the arms and legs (if indicated in the pattern)


MAKING THE LOONS
A lot of patterns will not give you an actual pattern piece for pantaloons or a slip (underskirt). They will simply tell you how long and tall the piece of material should be and most will have directions or diagrams for how they should be sewn.
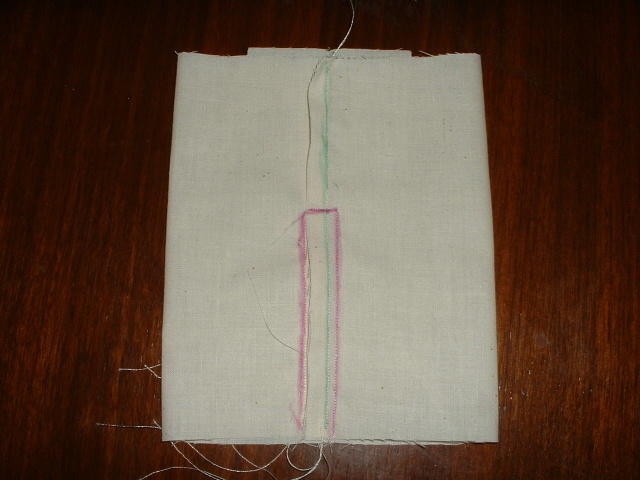
For loons cut a piece of material the length and width indicated in pattern.

Fold from left to right.
Sew the side about 1/4" from edge (green marking)


Move the seam to the middle
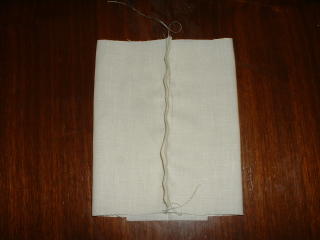


Sew up one side close to seam, across a few stitches and back down other side (Purple marking)
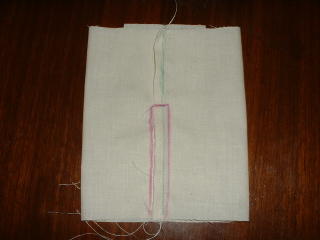

Clip between the stitching making sure to clip the corners
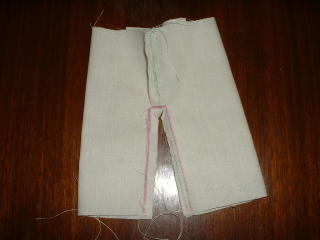


Turn loons right side out and sew a running/gathering stitch around waist (red thread)


Put them on your doll and cinch tight. You may want to tack the sides to the doll's body.

NOW JUST ADD ANY ACCESORIES YOU MAY HAVE AND YOU ARE DONE! CONGRATULATIONS!


Recipe for Doll Perfume
VERY EASY!
1 oz candle oil
3 oz distilled water
Put in a spray bottle and SHAKE well before each application
I have sprays that I made 2 years ago that still smell as strong as the day I made them. The spray bottles I use come from Michael's and are 4 oz clear plastic bottles with a white sprayer. I lightly mist the dolls when I am done and also before I ship them. The scent that gets the most compliments is CinnaBun. I wouldn't recommend any floral scents. Remember-a little bit goes a LONG way!

Tuesday, September 20, 2005

SEWING HINTS & TIPS

Sewing Tips and Hints...
#1 The majority of sewing problems come from unbalanced tension...either your tension is too tight or too loose...If you see the needle thread on the bottom of your fabric-you tension is too loose. If you see your bobbin thread on the top of your fabric then the tension is too tight. The easiest way to check this is to use 2 different color threads that don't match your material. When you adjust your machine do so in SMALL increments and test sew between each adjustment. On most machines you should leave bobbin tension adjustments to a professional!
Some other things to check:
-Is your needle tightened?
-Is your machine on the correct settings?
-Is your thread tangled? Either with the bobbin thread or around the spool?
-Make sure your presser foot is DOWN when sewing! (I won't admit how often I do this!)
#2 CHANGE YOUR NEEDLE!! Sewing needles go dull very quickly and should be changed every few projects. Make sure you are using the proper needle for the project!! There are heavy duty needles for sewing on heavy fabric (corduroy, denim etc.) and light weight needles for sewing on light weight fabric (silk, chiffon etc.) Make sure the needle is tightened!
#3 Buy quality thread! Dust can cause all kinds of problems with your machine and nothing makes more dust than cheap thread! I use Coats & Clark which you can find even at Walmart.
#4 Buy a can of compressed air. (You can find it in the computer section at Walmart) Use it to keep your machine dust free...especially in the bobbin casing.
#5 When you are sewing fuzzy material such as warm and natural, use a tear away stabilizer over the top and bottom...this prevents your needle and presser foot from snagging and also prevents fuzzies getting into the bobbin case!
#6 Make sure you keep your machine well oiled! Check your owners manual to find out where to oil and how often and what type of oil to use!
Now for some tips:
-Make sure you reverse stitch at the beginning and end of a line of sewing-this will keep your thread from unraveling
-Start and end your stitching on a straight line-don't start or stop in a curve.
-Nothing worse than sewing and noticing when you're all done that the bobbin thread ran out halfway through. Before I wind my bobbin I take a piece of dark colored chalk and color about 8-10" of thread-as my bobbin thread comes to an end I can clearly see it!
-When sewing corners, sew a few stitches and with the needle in the down position-lift the pressure foot and turn the fabric. Don't try to manipulate the fabric into turning as you can break the needle, cause your material to pucker or create jagged lines instead of a nice smooth curve!
-When I am sewing multiple items on one piece of fabric (for instance a doll body, arms and legs) there is no need to cut the threads in between each piece. I gather a bit of slack in the thread and move on to the next part without cutting the thread. This saves a lot of time!
-I have a piece of masking tape along the edge of my sewing desk. I have used a marker to mark the lines of a yardstick on it. Beats having to hunt down my measuring tape!
Some of the tools that I recommend for sewing:
-Seam ripper (I have a couple of these!) You won't find anything better for ripping out small seams.
- Pin Cushion-I have one that is velcroed right to my machine! And LOTS of straight pins!
-A GOOD pair of scissors! And by good I mean ones that are SHARP & used ONLY for cutting material!
-A sewing box-one that has multiple compartments to hold threads, needles and all your "little" things!

Hope that helps some of you out a bit! If you have a tip or idea to add please give me a holler!!
Take Care!
Megan www.AmericanPrim.com

MAKING JAR LIGHTS

Jar Lights-How to make them!

Supplies:
Mason Jar (or similar jar)
Rusty Tin Lid (or other lid)
Electric Candle Light
Drill and Glass Drill Bit
E6000 Glue
Bushing (Optional)


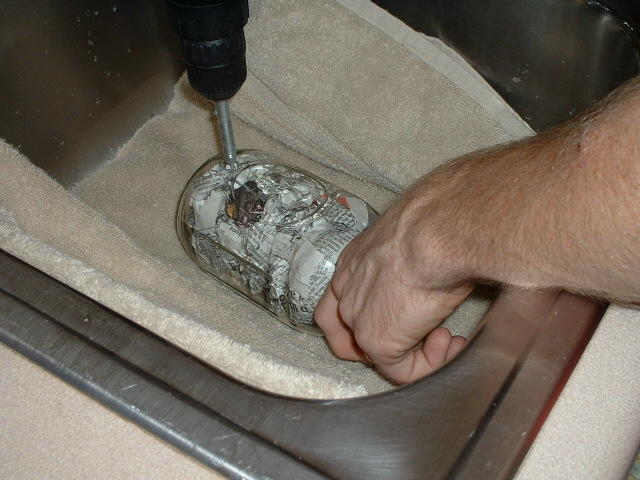
Step One: Stuff Jar with Newspaper for added support and line sink with a towel...Mark on the jar where you want your hole, being careful not to mark it too close to the bottom of the jar. You can place a piece of tape over the mark to help hold the drill bit in place while you begin drilling the hole. As you are drilling let water from the faucet flow over the hole (just a drip drip drip will do!) This keeps the jar and drill bit cool and helps keep it from cracking. DO NOT PUSH on the drill...let it do the work!

Step Two: ...First plug your candle in and make sure it works and then remove the light bulb. Now make sure your candle will fit down into your jar as you may have to sand some of the base off (see helpful hints!) If your electric candle lamp has a green felt covering over the bottom remove it.

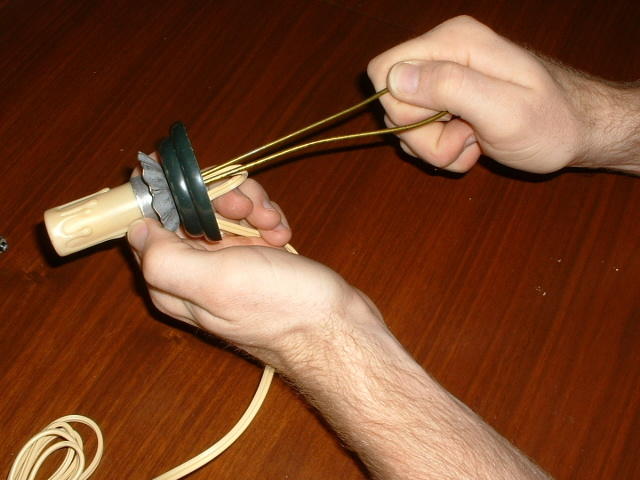
Next use a screwdriver or other type instrument (My hubby has bent a wire coat hanger to use) and push it up into the shaft of the candle lamp and pop out the socket inside.

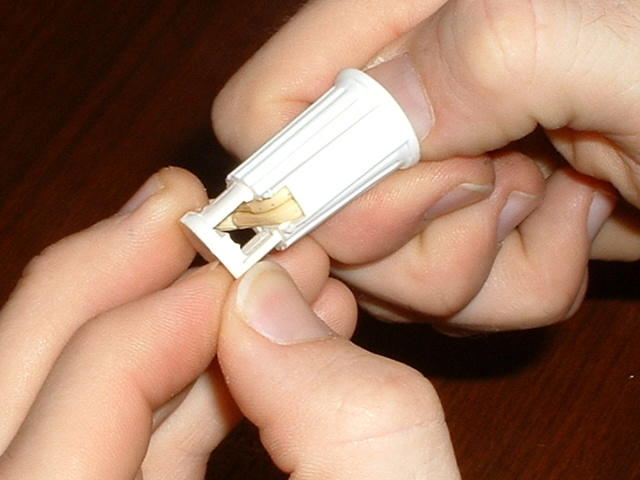
Step Three: Pop off the covering of the socket (not that I'm recommending this, but Hubby has to use his teeth...I prefer a flat head screwdriver to pry it off!) and expose the electric connection and remove the cord from the connector.


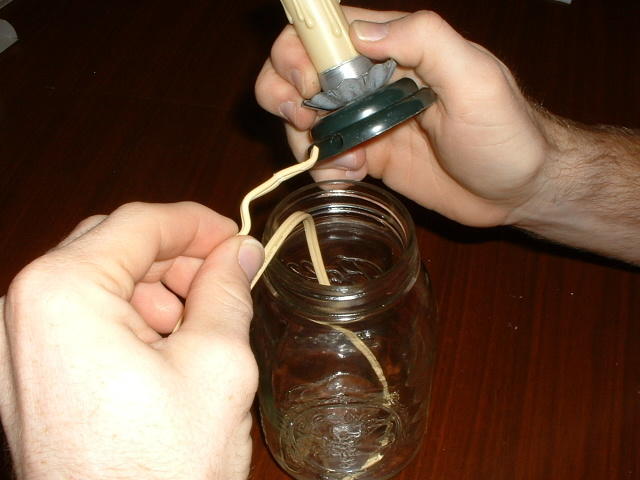
You can insert your bushing into the hole in the jar if you're using one. Thread the cord through the hole in the back of the jar and out through the top of the jar opening.

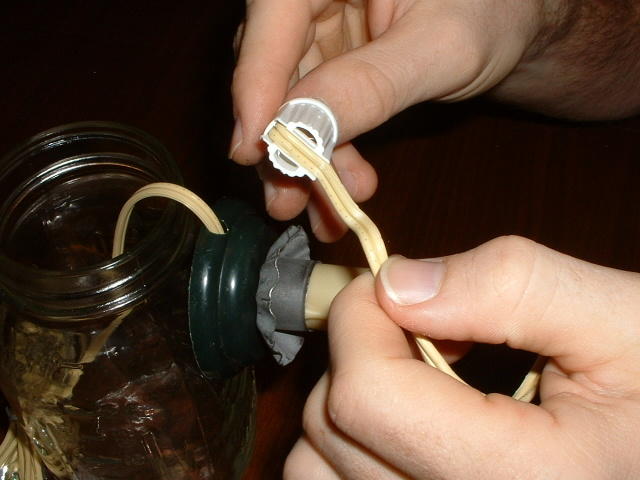
Thread the cord back through the base of the candle and into the shaft and place cord connections back into the socket.


Snap the cover back on. Now replace the bulb and check to be sure the light works (if not then check the connections-make sure the wires are touching the conductors inside the socket!)
Step Four: Push the shaft back onto the base. Using the E6000 glue put a bit around the rim of the base of the candle lamp and push it back into the jar, pressing the base firmly against the bottom of the jar. The E6000 glue dries fairly quickly so be sure your light is where you want it! (Centered in the jar and not off to the side)

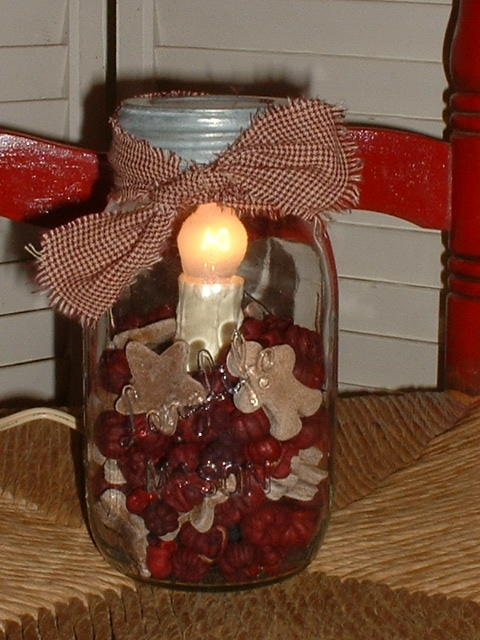
Step Five: Now you can fill your jar with scented fixins, potpourri or whatever you'd like!


Some Helpful Tips:
*Some folks find it works better to put the lid on the jar while they are drilling to add more stabilization to the jar.
*Using Wide Mouth Mason Jars is the easiest...but if your using any other type you may have to file the base of the candle lamp down to make sure it fits into the jar. I use a dremel but any type of sander will work or you can even use a knife to "shave" a bit of the base away. (your fixins will cover it!) Make sure your candle lamp is not too tall for your jar. I use the 2.5 inch for quart mason jars and either 3.5 or 4.5 for the gallon size.

WHERE TO BUY:
Mason Jars: You can find these at most Walmarts during canning season. They also carry them at Ace or True Value Hardware (or you can log onto www.acehardware.com and order them online...they can deliver them to your local Ace or True Value Hardware store for FREE!) I've picked up quite a few from yard sales, flea markets and thrift stores!

Electric Candle Lights: Since I have a tax ID, I order mine from www.craftwholesalers.com but you can find them at www.factorydirectcrafts.com or at your local Michaels or ACMoore...they sometimes have them at Joanns Fabrics or at Walmart close to Christmas!

E6000 Glue: You can find this at Walmart in the craft section or at Michaels also!

Glass Drill Bits and Bushings: I get mine from Lowes or Home Depot in the tool section with the other drill bits. Make sure it says for GLASS!! If you're not sure ask one of the sales associates! Supposedly, the diamond bits last longer than the carbide ones but I haven't seen a difference and for the price I'll take the carbide ones! You'll need to replace it after doing a couple cases of jars...You'll be able to feel when it needs to be replaced! The bushings can usually be found with electrical supplies but ask as they tend to put them with the screws and such also!

Rusty Lids: There are a number of places to get these including www.factorydirectcrafts.com and www.rustytin.com

TEA & COFFEE STAINING

GUIDE TO TEA & COFFEE STAINING

Supplies
Muslin or other material
Instant coffee
Tea bags
OPTIONAL
Vanilla extract
Ground Cinnamon, Cloves or other spices
Candle Oil

There are a few other products that you can use besides tea or coffee....I've heard of some folks using Rit Dye. I've known some that like to dye their fabric with "natural" elements...onionskins, berries etc...

Some folks like to do each doll individually but I find that it is easier for me to do a few yards of muslin or other material at a time!
If you are doing one dollie at a time you can either use a spray bottle and spray her down or apply the coffee stain with a sponge brush.
Many fabric manufacturers produce their fabric with an anti stain repellent on them so the first step is to wash your fabric using a detergent (Tide, All etc...) but NO FABRIC SOFTENER. (Muslin is OK to leave unwashed!) Leave your fabric wet.
Fill a large pot with water, tea bags and/or coffee...now I'm sure your probably saying HOW MUCH???.... This is where "practice" comes in!!!...This is my formula but you may prefer more or less depending on your "taste."....
For every gallon of water I use 3 family size tea bags and 1/2 cup of INSTANT coffee. For those who do not like the smell of coffee (like me!!) you can add about a 1/4 cup of vanilla extract to your concoction-it's perfectly OK to use the cheapest imitation vanilla you can find-in fact that's the kind I prefer! Or you can add a few drops of candle oil to your pot! Bring your mixture to a boil and then turn the heat down and add your fabric! Keeps an eye on it!!!...I like to let mine sit all day and then I turn off the heat completely and let it sit overnight!! The longer you let the material soak the darker it'll be!...When it's the perfect color for you take it out of the mixture and wring it out. You can either put it in the dryer, let it air dry, or take it over to your ironing board and add some more "grungy" to it by scorching it dry with a very hot dry iron! (No steam) Once your fabric is dry you're ready to trace your pattern and get to work...When I have sewn, cut out and stuffed my doll (but before I add her eyes, hair etc...) I like to spray her with some of that same coffee mixture that I've put it a spray bottle-wet her down good-place her FACE DOWN and pop her in the oven on a lined cookie sheet! (I use wax paper or aluminum foil to line the pan) at the LOWEST setting for about 20 minutes (Keep an eye on your dolly! Nothing worse than having to look a firefighter in the eye and tell him how the fire started!!!) For added interest you can also sprinkle instant coffee on her before you put her in the oven! There are lots of other ways to grubby up your creations...

HOW TO GRUBBY...
I'm using a doll as an example but you can do this on any of your fabric creations-use your imagination!...
Before you add your dolly's eyes, hair etc...
You can use the coffee/tea mixture (I add just a bit of white glue or modge podge to the coffe/tea mix) & a sponge brush to apply the mix to dolly and then you can sprinkle her with cinnamon, ground cloves etc... You can also open up a tea bag (the flavored teas are GREAT for this) and rub that all over dolly & then she can air dry or you can put her in the oven. (LOWEST SETTING!! Keep an eye on her!)

Another way to "Grubby" is to use a WATER based stain...paint it on your dolly with a sponge brush and then take a paper towel and wipe it off!...This also makes dolly stiff ! If you're planning on painting dolly's shoes or stripes, use the stain after your paint dries to give it a more subdued look! If you use a stain I DO NOT recommend putting dolly in the oven!!! Let her air dry!!....I like to use fine grain sandpaper to sand her a bit to give her a more "worn" look!!
I like to use the water based stain and modge podge on other creations...At Halloween I make pumpkins from Muslin...I paint them orange, sand them and then apply the water based stain mixed with modge podge...it ages them and makes them stiff!
Another idea is to apply paste wax-use a soft cloth and rub over your project (this looks great on black dolls too)...let it dry and then buff a bit...It looks like old aged leather when you apply it over a dark coffee stain!
If things aren't coming out as dark as you'd like it may take a few times of applying the mixtures and baking before they achieve a truly "prim & grubby" look...heating things in the oven helps to darken and age your creations!!....
If you want your projects to smell yummy try this: I add about 1 oz of scented oil to 3 oz of water (For home use I just use distilled water) Put it in a spray bottle and spritz your projects!
Alot of folks also ask about the "mammy dolls" and all I do is use some watered down "burnt umber" acrylic paint and apply 2 coats with a sponge brush. I let her air dry and use some fine grain sand paper to sand her down to give her a more worn look. Then I use a water-based stain or paste wax.
SOME HELPFUL TIPS:
*use a pot that you don't cook in! No one likes spaghetti noodles that have a coffee after taste! BLECH!
*If you use your dryer-put a damp old towel through when you're done to clean your dryer!
*I also recommend you buy a separate iron for all your craft needs-honey really hates when he irons his pants and winds up smelling like tea/coffee/cinnamon-or worse- looking like his pants have been tea dyed!! HEE HEE!! At the least make sure you cover your ironing board and clean your iron!)
*When you coffee stain projects make sure you lay them FACE DOWN...the coffee will seep to the top and give a VERY SPLOTCHY look-sometimes not the look you want for a dolly's face!!
*Coffee dye/cook your dollies BEFORE adding hair and eyes...the coffee mixture will make dollies hair stiff and ucky and the buttons and such may not take too well to a hot oven!
*I save my coffee mix in the fridge in a large jar-I usually only save it for no more than a week-but of course it's usually gone in a week too!
EXPIREMENT EXPIREMENT EXPERIMENT!!! I will sew up muslin circles...stuff them and then try out different techniques! See how things look with just coffee or tea, how it looks in the dryer, with the iron etc....