
Friday, October 19, 2007
ALL THE TUTORIALS YOU COULD POSSIBLY WANT!
I am a member at PrimMart THE bestest primitive/crafting forum on the net! Not only do we have the sweetest people there but we also offer soooo much to our clients and friends!!! Just go have a peek! A couple of the most popular links are for our LEARNING CENTER and for our Decorator's Gallery! But make sure you join our online community message boards!! We're always happy to see new faces!
Wednesday, October 25, 2006
HOLIDAY IDEAS-CRAFTS & DECORATING
Anyone that crafts or shops knows this is the BUSY time of year! I've got shows lined up and a ton to do and here I sit, but I wanted to share some easy decorating and craft ideas with you!
Thanks to all my friends for contributing ideas!! Alot of these ideas have been around for a while-If you know who the ORIGINAL artist was please let me know so that I may give proper credit. I've given credit to those who've given me pictures/poems/or directions!
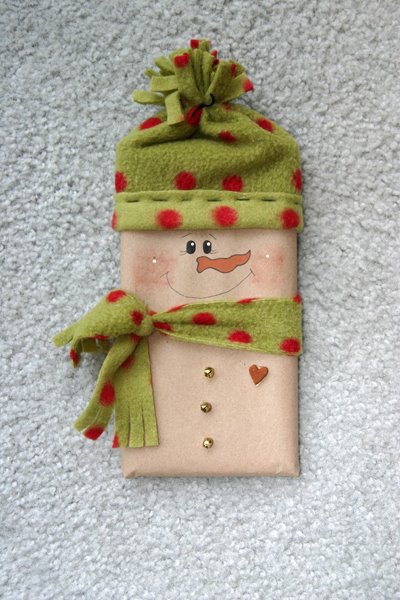
CHOCOLATE SNOWMAN


The only thing better than a snowman is a CHOCOLATE SNOWMAN! Isn't this ADORABLE? VERY easy to make! Thanks to Charlotte of
RAGGEDY HOLLOW for her permission to use this idea and her picture! Also THANK YOU to Patti for the picture of her version! In Patt's version she used white felt instead of paper.
SUPPLIES NEEDED:
Hershey's Bar (The ones in the pics are 1/2 pound bars)
Kraft or other heavy weight paper
Embellishments (Buttons etc...)
Colored markers/pens
Scrap of fleece (Twice as wide as the bar plus 1")
All you do is wrap the bar like you would a gift, making sure the seam is on the back side of the bar. You can use paint pens, crayons, paint etc to paint on the face. Use buttons, bells or pom poms for his "coal" buttons. Take the scrap of fleece and fold in half long wise and sew up the long seam. You can flip up the bottom cuff and sew a running stitch to make it more fashionable. Use a dab of glue to attach it to the bar. Tie a piece of thread about 1-2" from the top and clip to make the fringe. Tie a scrap around his neck for the scarf.
You can write this poem by Kim of SIMPLE NEEDS on a tag and attach it or write it on the back of the snowman!
S is for snowman
short and fat
sitting on the counter
wearing a hat
I took off the wrapper
and what did i see??
MMmm....chocolate!
too bad for the snowman,
but goodie for me!!!
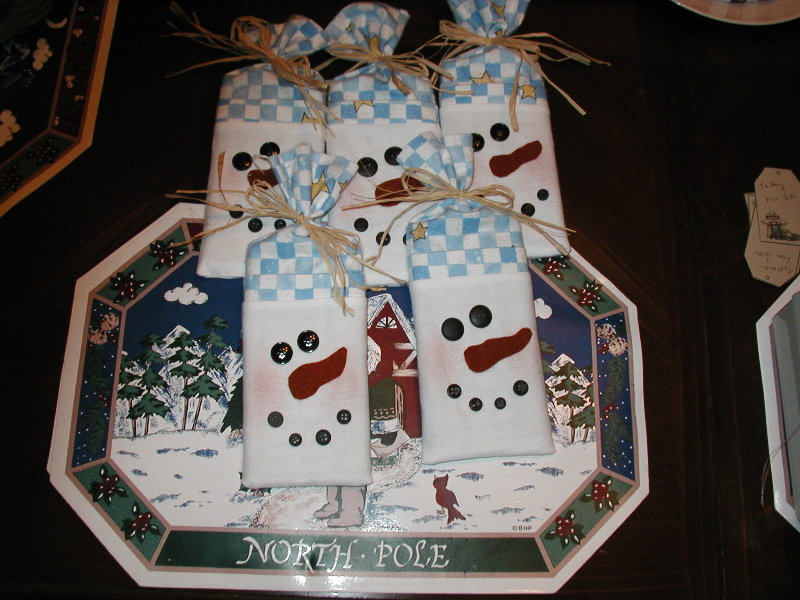
SNOWMAN SOUP
Another easy project with a new twist on it!
Snowman soup is basically hot cocoa, marshmallows, Hershey's kisses and a peppermint stick. You can package them up in a cello bag with a hang tag or a topper, put them inside of a coffee mug, or try this project out!
SUPPLIES:
Empty tin can (I use fruit or soup cans)
Can Opener (One that leaves no sharp edge! Walmart sells one by GOOD COOK for about $8)
Paper
Double sided tape
Elmer's glue (or other NON TOXIC glue)
Template for label
Open your can and empty contents. You can either open it from the top or bottom-whichever is easier! Peel off label and WASH THOUROUGHLY! Print out your label and attach to can with double sided tape or glue. Fill can with "soup" ingredients and glue lid back on. (You can also use double sided CARPET tape around the edge of the lid to seal it back on instead of glue!
Attach tag with Snowman soup poem.
SOME TIPS AND HINTS:
I buy my labels from Krista at COUNTRY CHARM GRAPHICS Krista has them all made up for you so the only thing you need to do is print it out!
You can also make your own template in whatever print program you use. Fill it in with whatever colors/sayings/graphics that you want and print it out.
SNOWMAN SOUP POEM:
Was told you've been real good this year
Always glad to hear it
With freezing weather drawing near
You'll need to warm the spirit
So here's a little Snowman Soup
Complete with stirring stick
Just add hot water, sip it slow
It's sure to do the trick!"
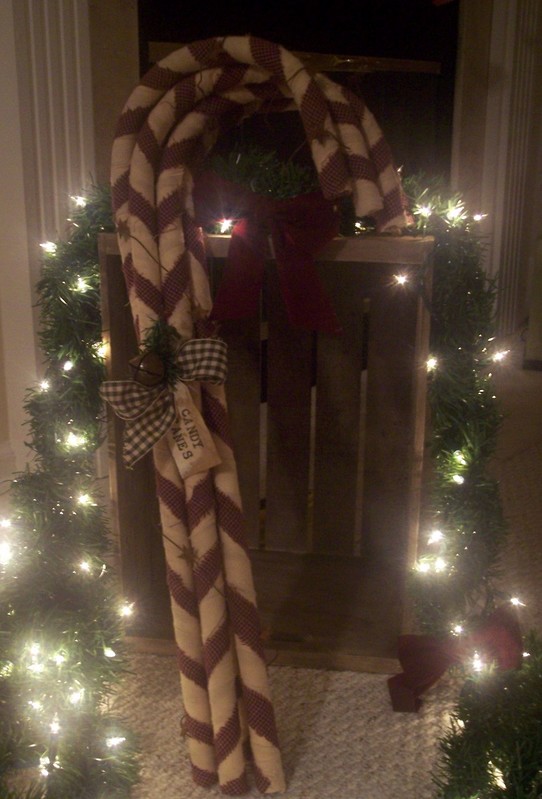
CANDY CANES
MANY thanks to ANGIE of ..... for her pictures and directions!

You will need the following materials to make one Candy Cane:
Plastic PVC Yard Candy Cane (found cheapest at Walmart or Dollar Stores)
1/4 yard Tea Stained Muslin
Red or Green Homespun
Hot Glue
*********
If your plastic candy canes red/green stripes are taped on (and not painted on) peel the tape off the white plastic candy cane. This will keep the red from showing through your muslin. If the stripes are painted or printed on, obviously disregard this step.
Tear your tea stained muslin into 1.5" wide strips. You should tear enough to make a 70" long strip. ( I used two 35" strips) Starting at the top of the candy cane, add a drop or two of glue on the tip of the candy cane and wrap the muslin around the tip and work your way down to the bottom, being sure to overlap your layers so that the white plastic doesnt show through.
Tear your homespun into 1" wide strips. You should tear enough to make a 35" to 40" long strip) Again, starting at the top, add a drop or two of hot glue and begin wrapping the homespun around, this time wrapping it further apart to create the stripe. Secure your homespun to the bottom of the candy cane with hot glue.
You can group several of these together and decorate however you like! Here are some additional embellishment ideas:
Rusty Wire
Rusty Bells
Glass Glitter
Wired Ribbon
Greenery
Prim Tags
*********
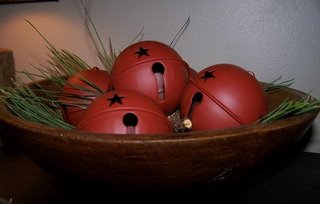
JINGLE BELLS
A great idea using a find from The Dollar Tree!
My friend Kathy of GK PRIMS found some big bells at the Dollar Tree but they were a bright brass color. So she went to Walmart and found some spray paint (Red Oxide Primer) and simply spray painted the bells! Aren't they wonderful? She has them displayed in an old wooden bowl with some evergreen sprigs but also offers up a few other ideas for decorating with them such as wiring them onto a wreath, adding some homespun hangers and hanging them on your tree or tied onto garland. I'm sure you can think of plenty of ideas for using these great jingle bells!
Thanks to all my friends for contributing ideas!! Alot of these ideas have been around for a while-If you know who the ORIGINAL artist was please let me know so that I may give proper credit. I've given credit to those who've given me pictures/poems/or directions!
The only thing better than a snowman is a CHOCOLATE SNOWMAN! Isn't this ADORABLE? VERY easy to make! Thanks to Charlotte of
RAGGEDY HOLLOW for her permission to use this idea and her picture! Also THANK YOU to Patti for the picture of her version! In Patt's version she used white felt instead of paper.
SUPPLIES NEEDED:
Hershey's Bar (The ones in the pics are 1/2 pound bars)
Kraft or other heavy weight paper
Embellishments (Buttons etc...)
Colored markers/pens
Scrap of fleece (Twice as wide as the bar plus 1")
All you do is wrap the bar like you would a gift, making sure the seam is on the back side of the bar. You can use paint pens, crayons, paint etc to paint on the face. Use buttons, bells or pom poms for his "coal" buttons. Take the scrap of fleece and fold in half long wise and sew up the long seam. You can flip up the bottom cuff and sew a running stitch to make it more fashionable. Use a dab of glue to attach it to the bar. Tie a piece of thread about 1-2" from the top and clip to make the fringe. Tie a scrap around his neck for the scarf.
You can write this poem by Kim of SIMPLE NEEDS on a tag and attach it or write it on the back of the snowman!
S is for snowman
short and fat
sitting on the counter
wearing a hat
I took off the wrapper
and what did i see??
MMmm....chocolate!
too bad for the snowman,
but goodie for me!!!
Another easy project with a new twist on it!
Snowman soup is basically hot cocoa, marshmallows, Hershey's kisses and a peppermint stick. You can package them up in a cello bag with a hang tag or a topper, put them inside of a coffee mug, or try this project out!
SUPPLIES:
Empty tin can (I use fruit or soup cans)
Can Opener (One that leaves no sharp edge! Walmart sells one by GOOD COOK for about $8)
Paper
Double sided tape
Elmer's glue (or other NON TOXIC glue)
Template for label
Open your can and empty contents. You can either open it from the top or bottom-whichever is easier! Peel off label and WASH THOUROUGHLY! Print out your label and attach to can with double sided tape or glue. Fill can with "soup" ingredients and glue lid back on. (You can also use double sided CARPET tape around the edge of the lid to seal it back on instead of glue!
Attach tag with Snowman soup poem.
SOME TIPS AND HINTS:
I buy my labels from Krista at COUNTRY CHARM GRAPHICS Krista has them all made up for you so the only thing you need to do is print it out!
You can also make your own template in whatever print program you use. Fill it in with whatever colors/sayings/graphics that you want and print it out.
SNOWMAN SOUP POEM:
Was told you've been real good this year
Always glad to hear it
With freezing weather drawing near
You'll need to warm the spirit
So here's a little Snowman Soup
Complete with stirring stick
Just add hot water, sip it slow
It's sure to do the trick!"
MANY thanks to ANGIE of ..... for her pictures and directions!
You will need the following materials to make one Candy Cane:
Plastic PVC Yard Candy Cane (found cheapest at Walmart or Dollar Stores)
1/4 yard Tea Stained Muslin
Red or Green Homespun
Hot Glue
*********
If your plastic candy canes red/green stripes are taped on (and not painted on) peel the tape off the white plastic candy cane. This will keep the red from showing through your muslin. If the stripes are painted or printed on, obviously disregard this step.
Tear your tea stained muslin into 1.5" wide strips. You should tear enough to make a 70" long strip. ( I used two 35" strips) Starting at the top of the candy cane, add a drop or two of glue on the tip of the candy cane and wrap the muslin around the tip and work your way down to the bottom, being sure to overlap your layers so that the white plastic doesnt show through.
Tear your homespun into 1" wide strips. You should tear enough to make a 35" to 40" long strip) Again, starting at the top, add a drop or two of hot glue and begin wrapping the homespun around, this time wrapping it further apart to create the stripe. Secure your homespun to the bottom of the candy cane with hot glue.
You can group several of these together and decorate however you like! Here are some additional embellishment ideas:
Rusty Wire
Rusty Bells
Glass Glitter
Wired Ribbon
Greenery
Prim Tags
*********
A great idea using a find from The Dollar Tree!
My friend Kathy of GK PRIMS found some big bells at the Dollar Tree but they were a bright brass color. So she went to Walmart and found some spray paint (Red Oxide Primer) and simply spray painted the bells! Aren't they wonderful? She has them displayed in an old wooden bowl with some evergreen sprigs but also offers up a few other ideas for decorating with them such as wiring them onto a wreath, adding some homespun hangers and hanging them on your tree or tied onto garland. I'm sure you can think of plenty of ideas for using these great jingle bells!

Sunday, October 22, 2006
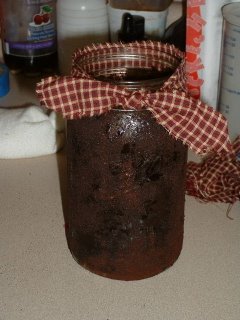
GRUBBY JARS!
SUPPLIES:
GLASS JARS
MODGE PODGE (OR ELMER'S GLUE)
INSTANT COFFEE OR GROUND SPICES
Pour instant coffee granules into a large bowl (you can use a plate or cookie sheet-whatever. Coat the jar with modge podge, one section at a time and then roll/push it into the coffee granules-bang the jar to get off the loose coffee...Do each section and then let it sit overnight. Then coat again with modge podge and roll again in coffee granules...Let dry overnight. Do this as many times as you want for the look you want.
Just a few notes: ALOT of the granules will fall off and after the first application you'll still be able to brush them off when dry-DON'T DO IT! Coat for the 2nd time and roll again. As the modge podge mixes with the granules it will make the modge podge DARK as it dries...kinda looks like molasses but dried...You can see in the pic the parts that look like that.
After you are satisfied with the look and it's dry, coat one more time to "seal" with modge podge.... (I didn't do this part tho...A TINY TINY amount of coffee "dust" came off when I ran my hands over the jar so I'm thinking if you coated one final time it'd be "sealed" really good)
You could try this with cinnamon or other ground spices too-or mix the coffee/cinnamon together...You might need to do one round of the coffee and then the next time do cinnamon as when the coffee gets wet it tends to dissolve a bit....
You will notice that some of it will slide down the jar-don't put too thick of a coat of modge podge on the jar or it WILL slide down-remember it's like spray painting-a few light coats is better than one drippy heavy one!
I did not use anything to "prep" the jar, I did not do the inside of the jar either...
You could print out your vintage picture or label and glue it on the jar then do the grunging around the label...I havn't tried that either.
These would be really cool with prim fabric flowers in them...or candles...I have this one sitting on my counter with a votive in it-looks very cool-hard to capture the "glow" on camera tho...
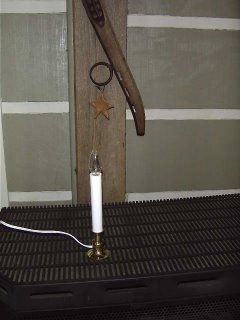
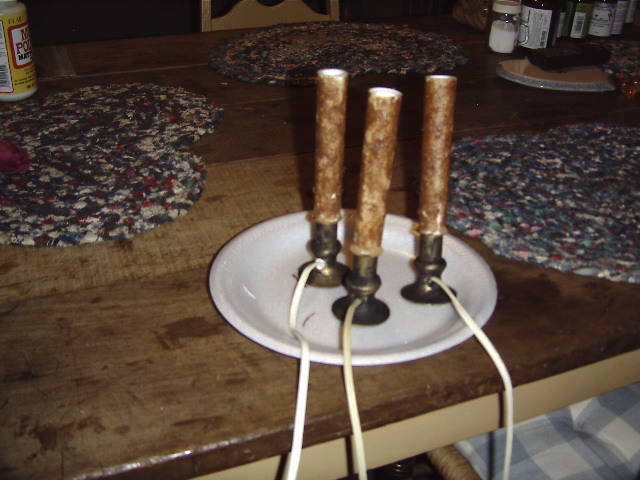
My friend Rilda used a similar method for grubbying up those tacky electic candles you can buy around Christmas time...Here are her directions and some pics to go along with it...
Coat the candle stick in modge podge and rub on different spices (Ground cinnamon, allspice, clove etc...). When it dries completely, coat with more Modge Podge and another coating of spices. This is the before-plain white...
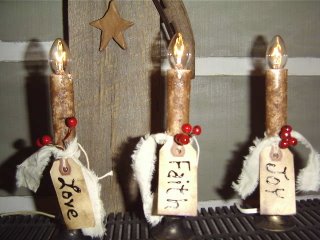
After the 2nd coat had dried completely, she painted the brass bases with a bit of black paint.

Aren't these great looking?? She added some "pizazz" by adding a tie, some berries and the cute tags!
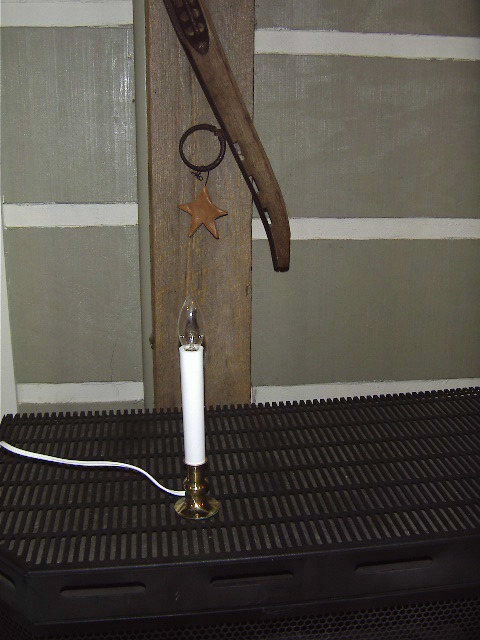
And yet ANOTHER version from Rilda...Instead of spices she used glitter on this candle. You could use glass glitter or mica also...Isn't it beautiful?

GLASS JARS
MODGE PODGE (OR ELMER'S GLUE)
INSTANT COFFEE OR GROUND SPICES
Pour instant coffee granules into a large bowl (you can use a plate or cookie sheet-whatever. Coat the jar with modge podge, one section at a time and then roll/push it into the coffee granules-bang the jar to get off the loose coffee...Do each section and then let it sit overnight. Then coat again with modge podge and roll again in coffee granules...Let dry overnight. Do this as many times as you want for the look you want.
Just a few notes: ALOT of the granules will fall off and after the first application you'll still be able to brush them off when dry-DON'T DO IT! Coat for the 2nd time and roll again. As the modge podge mixes with the granules it will make the modge podge DARK as it dries...kinda looks like molasses but dried...You can see in the pic the parts that look like that.
After you are satisfied with the look and it's dry, coat one more time to "seal" with modge podge.... (I didn't do this part tho...A TINY TINY amount of coffee "dust" came off when I ran my hands over the jar so I'm thinking if you coated one final time it'd be "sealed" really good)
You could try this with cinnamon or other ground spices too-or mix the coffee/cinnamon together...You might need to do one round of the coffee and then the next time do cinnamon as when the coffee gets wet it tends to dissolve a bit....
You will notice that some of it will slide down the jar-don't put too thick of a coat of modge podge on the jar or it WILL slide down-remember it's like spray painting-a few light coats is better than one drippy heavy one!
I did not use anything to "prep" the jar, I did not do the inside of the jar either...
You could print out your vintage picture or label and glue it on the jar then do the grunging around the label...I havn't tried that either.
These would be really cool with prim fabric flowers in them...or candles...I have this one sitting on my counter with a votive in it-looks very cool-hard to capture the "glow" on camera tho...

My friend Rilda used a similar method for grubbying up those tacky electic candles you can buy around Christmas time...Here are her directions and some pics to go along with it...
Coat the candle stick in modge podge and rub on different spices (Ground cinnamon, allspice, clove etc...). When it dries completely, coat with more Modge Podge and another coating of spices. This is the before-plain white...
After the 2nd coat had dried completely, she painted the brass bases with a bit of black paint.
Aren't these great looking?? She added some "pizazz" by adding a tie, some berries and the cute tags!

And yet ANOTHER version from Rilda...Instead of spices she used glitter on this candle. You could use glass glitter or mica also...Isn't it beautiful?

Friday, May 26, 2006
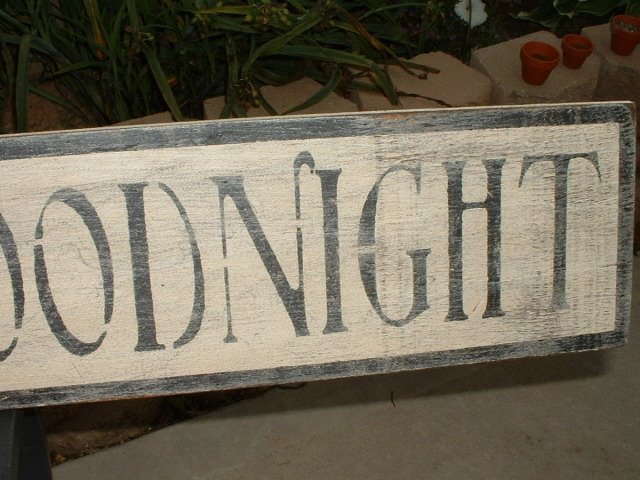
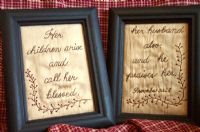
AGEING AND STENCILLING WOOD SIGNS


I enjoy making stencilled signs-you can see them in magazines and they sell for some serious money! (Serious as in OUCH!) I sell these signs on my sight for much less. I can do them in any color combination you choose. If you'd like to learn how to do them yourself...it's a very easy project!
I buy my stencils from Tori of STENCIL ME IN Her stencils are top quality, inexpensive and she's lightening fast! She also does custom orders!
My signs are all 6" high and the usual length is 24"-48" altho I have done shorter and longer ones.
The first step is to cut your wood. I buy sheets of 1/2" plywood and cut them to size.
Next, I paint my basecoat. I use regular acrylic paint...You can use the small bottles but I buy mine by the gallon at Lowe's. (Regular wall paint-make sure you ask for FLAT!)If I'm doing one at a time I just use a sponge brush but when I am gearing up for shows I use a roller! I usually also paint the backside.

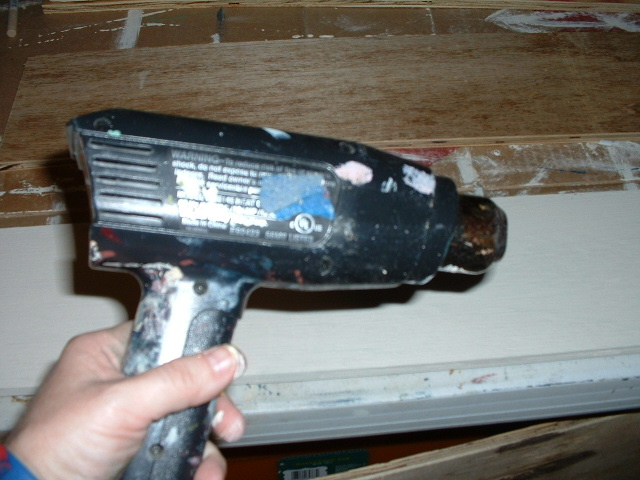
If you are impatient like me and can't wait for paint to dry-use a heat gun or a blow dryer. Be careful with the heat gun because it will make your paint bubble up if you hold it too long in one spot or too close.
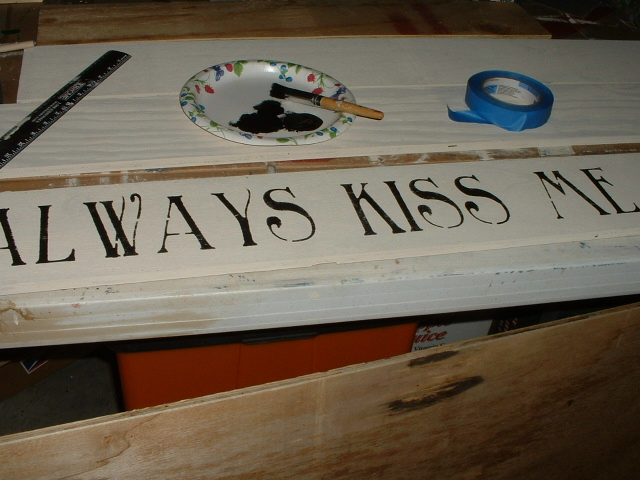
Then I tape my stencil to the board using blue painters tape. To make sure it is even on the board I pick the largest letter on the stencil and make sure it is the same distance from the top as from the bottom. (This works great for stencils that are in all caps.) For stencils that have lower case letters I use the same method EXCEPT if there are letters such as "y" or "g". In that case, I try to make sure it is even from the top using the tallest letter and the same on the bottom using the bottom of the "y" or "g".

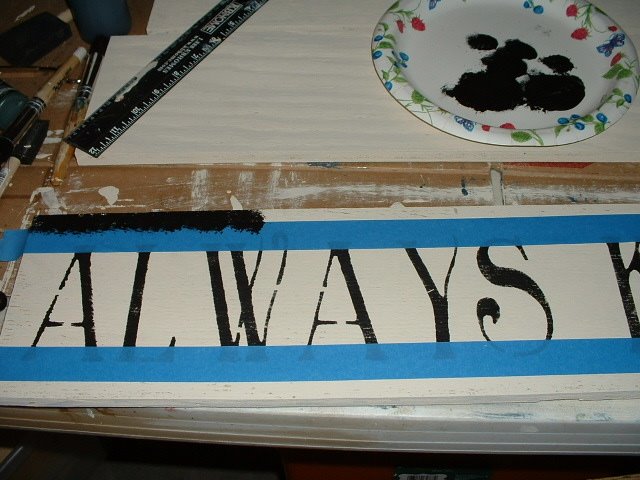
Once the stencil is taped down I use a stencil brush to dab the paint on. (Just a note on the brushes-I use the stencil brushes that have the black bristles. These ones are not stiff like others and it makes it so much easier!) Dip your brush in the paint-dab a bit off on a napkin-and "pounce" the paint on. When you are done SLOWLY lift the stencil off. I use my heat gun to dry the lettering. Some folks will go back with a paint brush and paint in the "bridges" of the stencils...I don't, but that is just my preference...I WANT it to look stenciling!
Now this next step is just a trademark of how I do my signs. A customer's husband suggested that I put a border around the sign and that is the way I have made them ever since. Thanks Wolfie's hubby The Raggedy Princess
I tape off about 1/2" along the edge of the sign-one side at a time and stencil the letter color around the edge like a frame.
At this point I let it dry overnight-or at least for a few hours. Paint that is not set will gum up your sand paper and make a mess!
Once it's dry, I use a hand sander and 60 grit sandpaper to sand the paint off the edges and to round the corners. I also sand in a side to side motion over the letters to give them a worn look.

Wipe the board down to get all the dust off and then apply your stain. I use MINWAX PROVINCIAL. I use a foam brush or a paint brush to apply the stain-don't try to be neat about it-just get it on there making sure to pay special attention to the corners and edges. I let mine sit for about 10 minutes and then I use a shop towel or old tshirt to wipe the stain off. If it's not as dark as you'd like it, apply the stain again and let it sit longer.

I let the sign sit overnight to give the stain plenty of time to dry. If it's humid out it will take longer for it to dry!
Add your picture hangers-measure the same distance in on both sides and hammer the picture hangers in. I always use two.
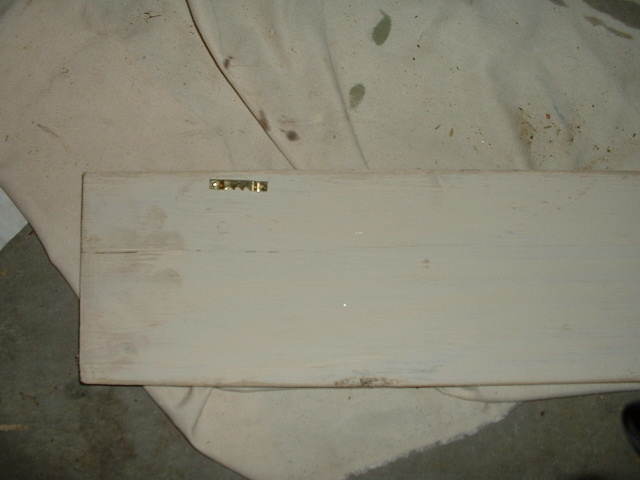
All done...Now you just have to find a clear wall space to hang your sign!

Monday, January 16, 2006
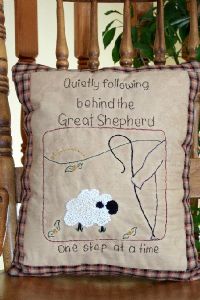
BEGINNER'S STITCHERY
The following article was written by my friend CINDER of BLESS MY STITCHES I hope that you'll check out her site for her BEAUTIFUL work!


As I always say...and y'all are probably tired of hearing it!! "I LOVE TO STITCH"
What you need to get started:
*some muslin
*some warm and natural (or a second layer of muslin...if you just have to get started right away, I speak from experience here!)
*a pencil
*a pattern (coloring sheets are fun to start with)
*a bright window
*a sharp embroidery needle
*embroidery floss in assorted colors
*fabric or a frame depending on how you want to finish your work of art
*coffee or tea mixture and a spray bottle
*optional~colored pencils, paints or crayons
Getting started:
Trace pattern onto muslin using your pencil and a bright window if necessary.
Lay muslin over warm and natural and pin together.
I use 2 strands of floss and a back-stitch for most of my stitching. This is an example of how to do the backstitch.

I use French knots to dot i's and to make "eyes" usually...they are tricky, but so fun once you get the hang of it!
 Bring needle up at 1. Wrap floss once around needle and insert needle at 2, holding end of floss with non-stitching fingers. Tighten knot, then pull needle through fabric, holding floss until it must be released. For a larger knot, wrap floss around needle more times.
This link has a great tutorial on doing french knots!
I have been using a stem stitch quite a bit lately too, since I finally got it figured out...adds a bit more dimension.
 The needle comes up a "A" and goes down at "B." Come up again at "C," exactly half way between "A" and "B." (Diagram 1) To continue, the needle goes down at "D" and comes up at "B," in the same hole made by the thread going down at "B." (Diagram 2) Continue by repeating Diagram 2. The thread may be held on either side of the needle, right or left, but should remain on the same side once the row of stitches is begun.
Snowman and Annie noses always look great done with a satin stitch.
 Bring needle up at odd numbers and go down at even numbers with stitches touching but not overlapping.
Most patterns will tell you what stitches to use.
Finish up your stitching and then on to the grunging part!
My staining method:
I put about 1/4 cup of instant coffee to about 2 cups hot water. Stir it up to dissolve the coffee. You can also add a few drops of fragrance oil and/or some vanilla. Put in a spray bottle and spray to soak your stitchery. Place on a cookie sheet and put it in the oven at 200 for about 10 minutes. In warmer weather I usually hang them on the clothes line, spray and let them dry in the sun! I usually do this 2-3 times, but I like things a bit darker. It's totally up to you. Some people even prefer to use muslin that has been stained BEFORE they stitch, but I like the way the coffee pulls away from the stitches and darkens up and such. Keep an eye though, you don't want it to burn. You can also color in parts of your design if you like, for example...putting a bit of "blush" on an Annie's cheeks...whitening up a snowman, whatever. The more you stitch the more you will figure out what you like...experiment, experiment, experiment!! And my favorite part of prim is...anything goes!! Even if you burn it, there is probably some one out there who will love it!
Finishing:
Now you can frame it...sew it into a pillow...or if it's small enough, blanket-stitch some homespun to the back and tie a jute hanger to it for a prim ornie!!
HOW TO MAKE A PILLOW:
Cut 4 strips of homespun about 2-3 inches wide and 2-34 inches longer than finished stitchery width/length. Sew to edges of stitchery leaving about 1/4 to a half inch or so space from stitching. Lay on chosen backing fabric right sides together and cut backing fabric to fit. Sew together leaving an opening about 3 inches for turning and stuffing. Turn and stuff firm and stitch closed. There you go!! Finished and ready for compliments!!
Please remember to give credit where credit is due...if you post pics online or sell your finished product on a web-site, ebay...wherever~artists really do appreciate you giving them credit as the designer. And remember although you buy a pattern, the designer still owns their original work...so no photocopying or forwarding the patterns via email. When in doubt just ask the designer...we are all pretty easy to get along with...most of the time *wink*!
Please feel free to email me with any questions...I'd love to help you!
CINDER IS OFFERING A SPECIAL TO ALL MY BLOG READERS ON HER PATTERN SIGHT...THRU THE END OF FEBRUARY BUY ONE PATTERN GET ONE FREE!! JUST TYPE "MEGAN'S BLOG" IN THE NOTES!
BLESS MY STITCHES


As I always say...and y'all are probably tired of hearing it!! "I LOVE TO STITCH"
What you need to get started:
*some muslin
*some warm and natural (or a second layer of muslin...if you just have to get started right away, I speak from experience here!)
*a pencil
*a pattern (coloring sheets are fun to start with)
*a bright window
*a sharp embroidery needle
*embroidery floss in assorted colors
*fabric or a frame depending on how you want to finish your work of art
*coffee or tea mixture and a spray bottle
*optional~colored pencils, paints or crayons
Getting started:
Trace pattern onto muslin using your pencil and a bright window if necessary.
Lay muslin over warm and natural and pin together.
I use 2 strands of floss and a back-stitch for most of my stitching. This is an example of how to do the backstitch.

I use French knots to dot i's and to make "eyes" usually...they are tricky, but so fun once you get the hang of it!
 Bring needle up at 1. Wrap floss once around needle and insert needle at 2, holding end of floss with non-stitching fingers. Tighten knot, then pull needle through fabric, holding floss until it must be released. For a larger knot, wrap floss around needle more times.
This link has a great tutorial on doing french knots!
I have been using a stem stitch quite a bit lately too, since I finally got it figured out...adds a bit more dimension.
 The needle comes up a "A" and goes down at "B." Come up again at "C," exactly half way between "A" and "B." (Diagram 1) To continue, the needle goes down at "D" and comes up at "B," in the same hole made by the thread going down at "B." (Diagram 2) Continue by repeating Diagram 2. The thread may be held on either side of the needle, right or left, but should remain on the same side once the row of stitches is begun.
 Snowman and Annie noses always look great done with a satin stitch.
 Bring needle up at odd numbers and go down at even numbers with stitches touching but not overlapping.
Most patterns will tell you what stitches to use.
Finish up your stitching and then on to the grunging part!
My staining method:
I put about 1/4 cup of instant coffee to about 2 cups hot water. Stir it up to dissolve the coffee. You can also add a few drops of fragrance oil and/or some vanilla. Put in a spray bottle and spray to soak your stitchery. Place on a cookie sheet and put it in the oven at 200 for about 10 minutes. In warmer weather I usually hang them on the clothes line, spray and let them dry in the sun! I usually do this 2-3 times, but I like things a bit darker. It's totally up to you. Some people even prefer to use muslin that has been stained BEFORE they stitch, but I like the way the coffee pulls away from the stitches and darkens up and such. Keep an eye though, you don't want it to burn. You can also color in parts of your design if you like, for example...putting a bit of "blush" on an Annie's cheeks...whitening up a snowman, whatever. The more you stitch the more you will figure out what you like...experiment, experiment, experiment!! And my favorite part of prim is...anything goes!! Even if you burn it, there is probably some one out there who will love it!
Finishing:
Now you can frame it...sew it into a pillow...or if it's small enough, blanket-stitch some homespun to the back and tie a jute hanger to it for a prim ornie!!
HOW TO MAKE A PILLOW:
Cut 4 strips of homespun about 2-3 inches wide and 2-34 inches longer than finished stitchery width/length. Sew to edges of stitchery leaving about 1/4 to a half inch or so space from stitching. Lay on chosen backing fabric right sides together and cut backing fabric to fit. Sew together leaving an opening about 3 inches for turning and stuffing. Turn and stuff firm and stitch closed. There you go!! Finished and ready for compliments!!
Please remember to give credit where credit is due...if you post pics online or sell your finished product on a web-site, ebay...wherever~artists really do appreciate you giving them credit as the designer. And remember although you buy a pattern, the designer still owns their original work...so no photocopying or forwarding the patterns via email. When in doubt just ask the designer...we are all pretty easy to get along with...most of the time *wink*!
Please feel free to email me with any questions...I'd love to help you!
CINDER IS OFFERING A SPECIAL TO ALL MY BLOG READERS ON HER PATTERN SIGHT...THRU THE END OF FEBRUARY BUY ONE PATTERN GET ONE FREE!! JUST TYPE "MEGAN'S BLOG" IN THE NOTES!
BLESS MY STITCHES
Thursday, December 15, 2005
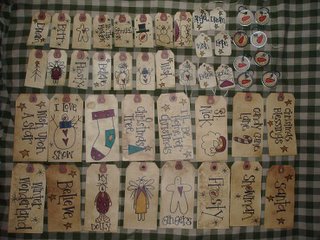
HANDMADE GRUBBY TAGS
Handmade Grubby Grungy Aged Tags
Supplies:
Shipping Tags (Whichever size you choose-You can find these at your local Office Supply Store)
Instant Coffee or Walnut Ink
Vanilla (optional)
Candle oil (Optional)
Stamps, Pens, Pictures (You'll need modge podge for the pictures)
These are really simple to make and add a great accent to your crafts!
First you'll need to mix your coffee stain. I take one cup of HOT water and add in 3 HEAPING tablespoons of instant coffee. (You can add a few drops of the vanilla if you would like) I put it into a spray bottle but you can also pour it into a shallow cookie sheet that has a lip around the edge and soak them or use a sponge brush to apply it.
Once you've stained your tags, place them on a dry cookie sheet in the oven on LOW until they dry out. If they are not dark enough then you can spray them again until you achieve the look you want.
To use the walnut ink, mix one teaspoon of granules (more or less depending on your preference) with 1 cup of HOT water. Stir until the crystals have dissolved. I would recommend using a sponge brush to apply this mixture to your tags. You can let them air dry or put them in the oven on low. If the little hole reinforcer falls off just glue it back on once it's dry. If your tags have curled up you can use an iron set on cotton setting to iron them out. I would use a pressing cloth or a small washrag over the tag and then iron on top of that.
Once they are dry, use your stamps to stamp a special message or a sharpie marker to write a neat saying. You can print out vintage pictures and modge podge them onto the tag. If the pictures are too bright on the stained tag stir a bit of the coffee mixture into the modge podge first. Try adding some pizzazz with glass glitter or mica flakes. You can embellish them with buttons, stickers, or rickrack. Check out the scrapbook section of your local craft store for lots of different ideas. You can also use different things in place of the strings-raffia, jute, or strips of homespun.
To add scent to your tags, I use 1 oz candle oil to 3 oz distilled water and put it into a spray bottle. Spritz the tags on the back and they'll smell terrific! Some folks add the oil to their coffee or ink mixture but to me it smells strongest when applied this way.
There is also another way to do tags and that is to print them out with the graphics already done. Terri from www.pumpkin-seed-primitives.com has done some this way with graphics from her CD.
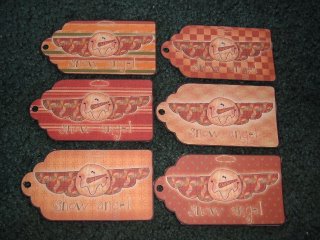
Here are some handprinted tags from Erin of www.whimsicalprincess.com
Erin has also offered this tip:
Because electricity is so expensive here in Canada, when we have a beautiful, hot sunny day I antique my tags in coffee and vanilla like everyone else (the hotter the water the better, it tends to get to the fibers in the tags better) I then use old screen doors to put my tags on. (I am usually doing 200-500 at a time) I leave them out in the sun and let Mother Nature do it's thing, as they start to dry you can re-dip to make darker.
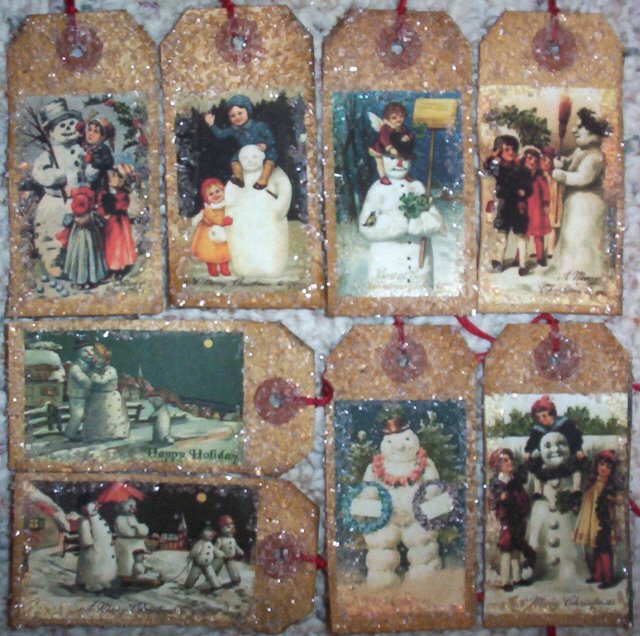
Here is another example of tags made by Stacey of www.primprimitives.com Stacey sells most of her tags on ebay under user name abigailes_mommy. She uses vintage pictures and embellishes her tags with glass glitter.

I am including some links for tags that are ready to print and also a blank template to make your own tags.
With the template, I use my print program, add graphics and then print out on Kraft Colored cardstock. You can use regular colored cardstock and coffee stain it first to print out the tags on, too.
Here are some free tags from www.primmart.com
http://www.primmart.com/FREEPrimitiveTags.html
http://www.primdoodles.com/printables6.asp
Here is a template courtesy of Cheryl at www.raggedyscrappin.com
http://www.raggedyscrappin.com/store/piclink.asp?pageID=freetemplates
Supplies:
Shipping Tags (Whichever size you choose-You can find these at your local Office Supply Store)
Instant Coffee or Walnut Ink
Vanilla (optional)
Candle oil (Optional)
Stamps, Pens, Pictures (You'll need modge podge for the pictures)
These are really simple to make and add a great accent to your crafts!
First you'll need to mix your coffee stain. I take one cup of HOT water and add in 3 HEAPING tablespoons of instant coffee. (You can add a few drops of the vanilla if you would like) I put it into a spray bottle but you can also pour it into a shallow cookie sheet that has a lip around the edge and soak them or use a sponge brush to apply it.
Once you've stained your tags, place them on a dry cookie sheet in the oven on LOW until they dry out. If they are not dark enough then you can spray them again until you achieve the look you want.
To use the walnut ink, mix one teaspoon of granules (more or less depending on your preference) with 1 cup of HOT water. Stir until the crystals have dissolved. I would recommend using a sponge brush to apply this mixture to your tags. You can let them air dry or put them in the oven on low. If the little hole reinforcer falls off just glue it back on once it's dry. If your tags have curled up you can use an iron set on cotton setting to iron them out. I would use a pressing cloth or a small washrag over the tag and then iron on top of that.
Once they are dry, use your stamps to stamp a special message or a sharpie marker to write a neat saying. You can print out vintage pictures and modge podge them onto the tag. If the pictures are too bright on the stained tag stir a bit of the coffee mixture into the modge podge first. Try adding some pizzazz with glass glitter or mica flakes. You can embellish them with buttons, stickers, or rickrack. Check out the scrapbook section of your local craft store for lots of different ideas. You can also use different things in place of the strings-raffia, jute, or strips of homespun.
To add scent to your tags, I use 1 oz candle oil to 3 oz distilled water and put it into a spray bottle. Spritz the tags on the back and they'll smell terrific! Some folks add the oil to their coffee or ink mixture but to me it smells strongest when applied this way.
There is also another way to do tags and that is to print them out with the graphics already done. Terri from www.pumpkin-seed-primitives.com has done some this way with graphics from her CD.

Here are some handprinted tags from Erin of www.whimsicalprincess.com

Erin has also offered this tip:
Because electricity is so expensive here in Canada, when we have a beautiful, hot sunny day I antique my tags in coffee and vanilla like everyone else (the hotter the water the better, it tends to get to the fibers in the tags better) I then use old screen doors to put my tags on. (I am usually doing 200-500 at a time) I leave them out in the sun and let Mother Nature do it's thing, as they start to dry you can re-dip to make darker.
Here is another example of tags made by Stacey of www.primprimitives.com Stacey sells most of her tags on ebay under user name abigailes_mommy. She uses vintage pictures and embellishes her tags with glass glitter.
I am including some links for tags that are ready to print and also a blank template to make your own tags.
With the template, I use my print program, add graphics and then print out on Kraft Colored cardstock. You can use regular colored cardstock and coffee stain it first to print out the tags on, too.
Here are some free tags from www.primmart.com
http://www.primmart.com/FREEPrimitiveTags.html
http://www.primdoodles.com/printables6.asp
Here is a template courtesy of Cheryl at www.raggedyscrappin.com
http://www.raggedyscrappin.com/store/piclink.asp?pageID=freetemplates
Wednesday, October 19, 2005
PRIMITIVE SNOWBALLS
Supplies:
Foam Balls (any size you want)
Joint Compound (Can be found at Walmart over in the hardware section)
Mica Flakes, Glass Glitter or regular glitter
ModgePodge
I grew up in Florida and now live in North Carolina-I prefer these kinda snowballs to the real thing anyday!!
There are a few ways to do this...
*You can roll the balls in the mica/glitter while the joint compound is still wet...I'd wait until the compound "sets up" a bit before trying it that way tho!
*You can skip the joint compound and just use modge podge and roll the ball in the mica.
This is the way that I do them...
-SQUEEZE your foam balls or roll them on the counter to "compact" them-you don't HAVE to do this but I like to get my stress out!! HA HA!
-Open your joint compound and STIR STIR STIR! Get your hands dirty...use your hands and fingers to press the compound onto the foam-doesn't have to be even or "pretty"! A little tip is to let the joint compound sit for a little while to harden a bit-maybe 30 minutes. It can be pretty slushy otherwise. I just set the balls on some aluminum foil on my counter.

-Let dry overnight.
-You can elect to sand them a bit or use them as is!...In the pic you can see the difference in them.Use 150 grit sandpaper and sand them lightly. My suggestion is to dampen your hands a bit and rub them over the balls first. Sanding joint compound get VERY dusty and the little bit of moisture helps with that...Otherwise I'd advise wearing a mask or something similar over your mouth and nose and sand them OUTSIDE! (Remember it's dusty-Don't wanna have to clean anymore than we have to right??)

-Once they are sanded, dust them off. Lay some aluminum foil or parchment paper down on your work surface. Dump some Mica Flakes into a plastic bowl. Using a sponge brush, coat your ball with modgepodge then roll the ball in the mica flakes. I hold the bowl and "swirl" it around. Take it out and set it on your work surface to dry!

Lots of uses for these...use the smaller balls to fill up a mason jar or put in with some wintertime potpourri or fixins. Decorate a sewing drawer or cheese box light, add to a wood bowl or basket with some greenery or pip berries. Set them on a shelf with some of your snowman collectibles! They are a great addition to your winter decorating!
Subscribe to:
Posts (Atom)