
Sewing Tips and Hints...
#1 The majority of sewing problems come from unbalanced tension...either your tension is too tight or too loose...If you see the needle thread on the bottom of your fabric-you tension is too loose. If you see your bobbin thread on the top of your fabric then the tension is too tight. The easiest way to check this is to use 2 different color threads that don't match your material. When you adjust your machine do so in SMALL increments and test sew between each adjustment. On most machines you should leave bobbin tension adjustments to a professional!
Some other things to check:
-Is your needle tightened?
-Is your machine on the correct settings?
-Is your thread tangled? Either with the bobbin thread or around the spool?
-Make sure your presser foot is DOWN when sewing! (I won't admit how often I do this!)
#2 CHANGE YOUR NEEDLE!! Sewing needles go dull very quickly and should be changed every few projects. Make sure you are using the proper needle for the project!! There are heavy duty needles for sewing on heavy fabric (corduroy, denim etc.) and light weight needles for sewing on light weight fabric (silk, chiffon etc.) Make sure the needle is tightened!
#3 Buy quality thread! Dust can cause all kinds of problems with your machine and nothing makes more dust than cheap thread! I use Coats & Clark which you can find even at Walmart.
#4 Buy a can of compressed air. (You can find it in the computer section at Walmart) Use it to keep your machine dust free...especially in the bobbin casing.
#5 When you are sewing fuzzy material such as warm and natural, use a tear away stabilizer over the top and bottom...this prevents your needle and presser foot from snagging and also prevents fuzzies getting into the bobbin case!
#6 Make sure you keep your machine well oiled! Check your owners manual to find out where to oil and how often and what type of oil to use!
Now for some tips:
-Make sure you reverse stitch at the beginning and end of a line of sewing-this will keep your thread from unraveling
-Start and end your stitching on a straight line-don't start or stop in a curve.
-Nothing worse than sewing and noticing when you're all done that the bobbin thread ran out halfway through. Before I wind my bobbin I take a piece of dark colored chalk and color about 8-10" of thread-as my bobbin thread comes to an end I can clearly see it!
-When sewing corners, sew a few stitches and with the needle in the down position-lift the pressure foot and turn the fabric. Don't try to manipulate the fabric into turning as you can break the needle, cause your material to pucker or create jagged lines instead of a nice smooth curve!
-When I am sewing multiple items on one piece of fabric (for instance a doll body, arms and legs) there is no need to cut the threads in between each piece. I gather a bit of slack in the thread and move on to the next part without cutting the thread. This saves a lot of time!
-I have a piece of masking tape along the edge of my sewing desk. I have used a marker to mark the lines of a yardstick on it. Beats having to hunt down my measuring tape!
Some of the tools that I recommend for sewing:
-Seam ripper (I have a couple of these!) You won't find anything better for ripping out small seams.
- Pin Cushion-I have one that is velcroed right to my machine! And LOTS of straight pins!
-A GOOD pair of scissors! And by good I mean ones that are SHARP & used ONLY for cutting material!
-A sewing box-one that has multiple compartments to hold threads, needles and all your "little" things!
Hope that helps some of you out a bit! If you have a tip or idea to add please give me a holler!!
Take Care!
Megan www.AmericanPrim.com
Tuesday, September 20, 2005
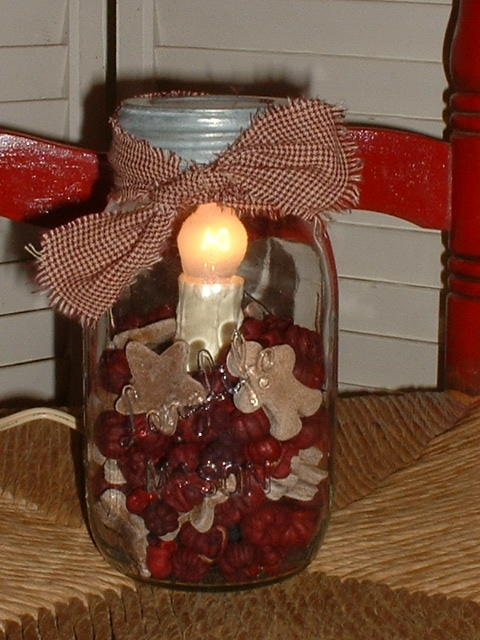
MAKING JAR LIGHTS
Supplies:
Mason Jar (or similar jar)
Rusty Tin Lid (or other lid)
Electric Candle Light
Drill and Glass Drill Bit
E6000 Glue
Bushing (Optional)
Step One: Stuff Jar with Newspaper for added support and line sink with a towel...Mark on the jar where you want your hole, being careful not to mark it too close to the bottom of the jar. You can place a piece of tape over the mark to help hold the drill bit in place while you begin drilling the hole. As you are drilling let water from the faucet flow over the hole (just a drip drip drip will do!) This keeps the jar and drill bit cool and helps keep it from cracking. DO NOT PUSH on the drill...let it do the work!

Step Two: ...First plug your candle in and make sure it works and then remove the light bulb. Now make sure your candle will fit down into your jar as you may have to sand some of the base off (see helpful hints!) If your electric candle lamp has a green felt covering over the bottom remove it.

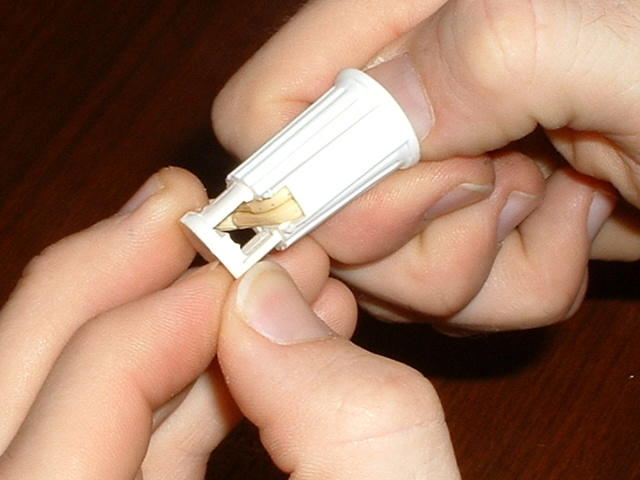
Next use a screwdriver or other type instrument (My hubby has bent a wire coat hanger to use) and push it up into the shaft of the candle lamp and pop out the socket inside.
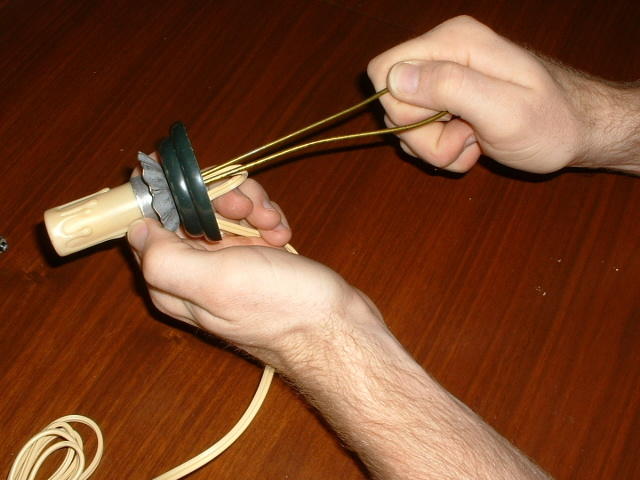
Step Three: Pop off the covering of the socket (not that I'm recommending this, but Hubby has to use his teeth...I prefer a flat head screwdriver to pry it off!) and expose the electric connection and remove the cord from the connector.

You can insert your bushing into the hole in the jar if you're using one. Thread the cord through the hole in the back of the jar and out through the top of the jar opening.
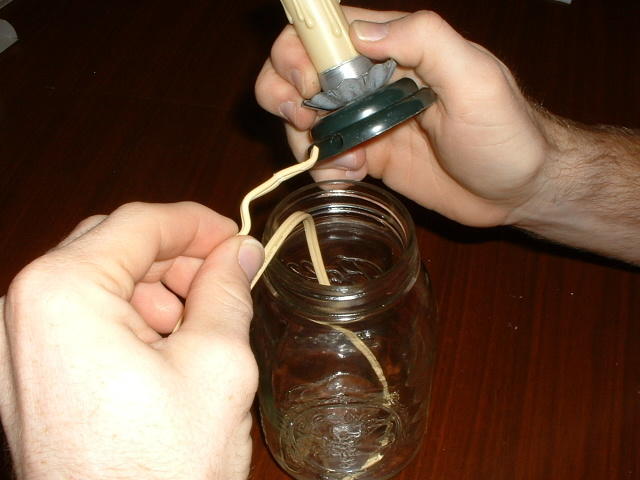
Thread the cord back through the base of the candle and into the shaft and place cord connections back into the socket.
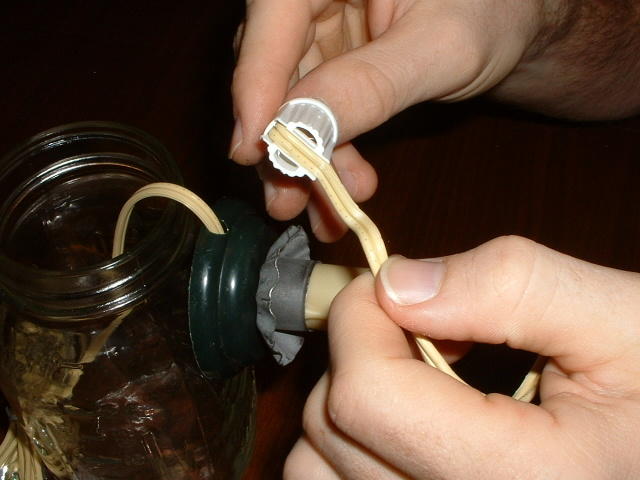
Snap the cover back on. Now replace the bulb and check to be sure the light works (if not then check the connections-make sure the wires are touching the conductors inside the socket!)
Step Four: Push the shaft back onto the base. Using the E6000 glue put a bit around the rim of the base of the candle lamp and push it back into the jar, pressing the base firmly against the bottom of the jar. The E6000 glue dries fairly quickly so be sure your light is where you want it! (Centered in the jar and not off to the side)

Step Five: Now you can fill your jar with scented fixins, potpourri or whatever you'd like!
Some Helpful Tips:
*Some folks find it works better to put the lid on the jar while they are drilling to add more stabilization to the jar.
*Using Wide Mouth Mason Jars is the easiest...but if your using any other type you may have to file the base of the candle lamp down to make sure it fits into the jar. I use a dremel but any type of sander will work or you can even use a knife to "shave" a bit of the base away. (your fixins will cover it!) Make sure your candle lamp is not too tall for your jar. I use the 2.5 inch for quart mason jars and either 3.5 or 4.5 for the gallon size.
WHERE TO BUY:
Mason Jars: You can find these at most Walmarts during canning season. They also carry them at Ace or True Value Hardware (or you can log onto www.acehardware.com and order them online...they can deliver them to your local Ace or True Value Hardware store for FREE!) I've picked up quite a few from yard sales, flea markets and thrift stores!
Electric Candle Lights: Since I have a tax ID, I order mine from www.craftwholesalers.com but you can find them at www.factorydirectcrafts.com or at your local Michaels or ACMoore...they sometimes have them at Joanns Fabrics or at Walmart close to Christmas!
E6000 Glue: You can find this at Walmart in the craft section or at Michaels also!
Glass Drill Bits and Bushings: I get mine from Lowes or Home Depot in the tool section with the other drill bits. Make sure it says for GLASS!! If you're not sure ask one of the sales associates! Supposedly, the diamond bits last longer than the carbide ones but I haven't seen a difference and for the price I'll take the carbide ones! You'll need to replace it after doing a couple cases of jars...You'll be able to feel when it needs to be replaced! The bushings can usually be found with electrical supplies but ask as they tend to put them with the screws and such also!
Rusty Lids: There are a number of places to get these including www.factorydirectcrafts.com and www.rustytin.com
TEA & COFFEE STAINING
GUIDE TO TEA & COFFEE STAINING
Supplies
Muslin or other material
Instant coffee
Tea bags
OPTIONAL
Vanilla extract
Ground Cinnamon, Cloves or other spices
Candle Oil
There are a few other products that you can use besides tea or coffee....I've heard of some folks using Rit Dye. I've known some that like to dye their fabric with "natural" elements...onionskins, berries etc...
Some folks like to do each doll individually but I find that it is easier for me to do a few yards of muslin or other material at a time!
If you are doing one dollie at a time you can either use a spray bottle and spray her down or apply the coffee stain with a sponge brush.
Many fabric manufacturers produce their fabric with an anti stain repellent on them so the first step is to wash your fabric using a detergent (Tide, All etc...) but NO FABRIC SOFTENER. (Muslin is OK to leave unwashed!) Leave your fabric wet.
Fill a large pot with water, tea bags and/or coffee...now I'm sure your probably saying HOW MUCH???.... This is where "practice" comes in!!!...This is my formula but you may prefer more or less depending on your "taste."....
For every gallon of water I use 3 family size tea bags and 1/2 cup of INSTANT coffee. For those who do not like the smell of coffee (like me!!) you can add about a 1/4 cup of vanilla extract to your concoction-it's perfectly OK to use the cheapest imitation vanilla you can find-in fact that's the kind I prefer! Or you can add a few drops of candle oil to your pot! Bring your mixture to a boil and then turn the heat down and add your fabric! Keeps an eye on it!!!...I like to let mine sit all day and then I turn off the heat completely and let it sit overnight!! The longer you let the material soak the darker it'll be!...When it's the perfect color for you take it out of the mixture and wring it out. You can either put it in the dryer, let it air dry, or take it over to your ironing board and add some more "grungy" to it by scorching it dry with a very hot dry iron! (No steam) Once your fabric is dry you're ready to trace your pattern and get to work...When I have sewn, cut out and stuffed my doll (but before I add her eyes, hair etc...) I like to spray her with some of that same coffee mixture that I've put it a spray bottle-wet her down good-place her FACE DOWN and pop her in the oven on a lined cookie sheet! (I use wax paper or aluminum foil to line the pan) at the LOWEST setting for about 20 minutes (Keep an eye on your dolly! Nothing worse than having to look a firefighter in the eye and tell him how the fire started!!!) For added interest you can also sprinkle instant coffee on her before you put her in the oven! There are lots of other ways to grubby up your creations...
HOW TO GRUBBY...
I'm using a doll as an example but you can do this on any of your fabric creations-use your imagination!...
Before you add your dolly's eyes, hair etc...
You can use the coffee/tea mixture (I add just a bit of white glue or modge podge to the coffe/tea mix) & a sponge brush to apply the mix to dolly and then you can sprinkle her with cinnamon, ground cloves etc... You can also open up a tea bag (the flavored teas are GREAT for this) and rub that all over dolly & then she can air dry or you can put her in the oven. (LOWEST SETTING!! Keep an eye on her!)
Another way to "Grubby" is to use a WATER based stain...paint it on your dolly with a sponge brush and then take a paper towel and wipe it off!...This also makes dolly stiff ! If you're planning on painting dolly's shoes or stripes, use the stain after your paint dries to give it a more subdued look! If you use a stain I DO NOT recommend putting dolly in the oven!!! Let her air dry!!....I like to use fine grain sandpaper to sand her a bit to give her a more "worn" look!!
I like to use the water based stain and modge podge on other creations...At Halloween I make pumpkins from Muslin...I paint them orange, sand them and then apply the water based stain mixed with modge podge...it ages them and makes them stiff!
Another idea is to apply paste wax-use a soft cloth and rub over your project (this looks great on black dolls too)...let it dry and then buff a bit...It looks like old aged leather when you apply it over a dark coffee stain!
If things aren't coming out as dark as you'd like it may take a few times of applying the mixtures and baking before they achieve a truly "prim & grubby" look...heating things in the oven helps to darken and age your creations!!....
If you want your projects to smell yummy try this: I add about 1 oz of scented oil to 3 oz of water (For home use I just use distilled water) Put it in a spray bottle and spritz your projects!
Alot of folks also ask about the "mammy dolls" and all I do is use some watered down "burnt umber" acrylic paint and apply 2 coats with a sponge brush. I let her air dry and use some fine grain sand paper to sand her down to give her a more worn look. Then I use a water-based stain or paste wax.
SOME HELPFUL TIPS:
*use a pot that you don't cook in! No one likes spaghetti noodles that have a coffee after taste! BLECH!
*If you use your dryer-put a damp old towel through when you're done to clean your dryer!
*I also recommend you buy a separate iron for all your craft needs-honey really hates when he irons his pants and winds up smelling like tea/coffee/cinnamon-or worse- looking like his pants have been tea dyed!! HEE HEE!! At the least make sure you cover your ironing board and clean your iron!)
*When you coffee stain projects make sure you lay them FACE DOWN...the coffee will seep to the top and give a VERY SPLOTCHY look-sometimes not the look you want for a dolly's face!!
*Coffee dye/cook your dollies BEFORE adding hair and eyes...the coffee mixture will make dollies hair stiff and ucky and the buttons and such may not take too well to a hot oven!
*I save my coffee mix in the fridge in a large jar-I usually only save it for no more than a week-but of course it's usually gone in a week too!
EXPIREMENT EXPIREMENT EXPERIMENT!!! I will sew up muslin circles...stuff them and then try out different techniques! See how things look with just coffee or tea, how it looks in the dryer, with the iron etc....
Subscribe to:
Comments (Atom)