


As I always say...and y'all are probably tired of hearing it!! "I LOVE TO STITCH"
What you need to get started:
*some muslin
*some warm and natural (or a second layer of muslin...if you just have to get started right away, I speak from experience here!)
*a pencil
*a pattern (coloring sheets are fun to start with)
*a bright window
*a sharp embroidery needle
*embroidery floss in assorted colors
*fabric or a frame depending on how you want to finish your work of art
*coffee or tea mixture and a spray bottle
*optional~colored pencils, paints or crayons
Getting started:
Trace pattern onto muslin using your pencil and a bright window if necessary.
Lay muslin over warm and natural and pin together.
I use 2 strands of floss and a back-stitch for most of my stitching. This is an example of how to do the backstitch.

I use French knots to dot i's and to make "eyes" usually...they are tricky, but so fun once you get the hang of it!
 Bring needle up at 1. Wrap floss once around needle and insert needle at 2, holding end of floss with non-stitching fingers. Tighten knot, then pull needle through fabric, holding floss until it must be released. For a larger knot, wrap floss around needle more times.
This link has a great tutorial on doing french knots!
I have been using a stem stitch quite a bit lately too, since I finally got it figured out...adds a bit more dimension.
 The needle comes up a "A" and goes down at "B." Come up again at "C," exactly half way between "A" and "B." (Diagram 1) To continue, the needle goes down at "D" and comes up at "B," in the same hole made by the thread going down at "B." (Diagram 2) Continue by repeating Diagram 2. The thread may be held on either side of the needle, right or left, but should remain on the same side once the row of stitches is begun.
 Snowman and Annie noses always look great done with a satin stitch.
 Bring needle up at odd numbers and go down at even numbers with stitches touching but not overlapping.
Most patterns will tell you what stitches to use.
Finish up your stitching and then on to the grunging part!
My staining method:
I put about 1/4 cup of instant coffee to about 2 cups hot water. Stir it up to dissolve the coffee. You can also add a few drops of fragrance oil and/or some vanilla. Put in a spray bottle and spray to soak your stitchery. Place on a cookie sheet and put it in the oven at 200 for about 10 minutes. In warmer weather I usually hang them on the clothes line, spray and let them dry in the sun! I usually do this 2-3 times, but I like things a bit darker. It's totally up to you. Some people even prefer to use muslin that has been stained BEFORE they stitch, but I like the way the coffee pulls away from the stitches and darkens up and such. Keep an eye though, you don't want it to burn. You can also color in parts of your design if you like, for example...putting a bit of "blush" on an Annie's cheeks...whitening up a snowman, whatever. The more you stitch the more you will figure out what you like...experiment, experiment, experiment!! And my favorite part of prim is...anything goes!! Even if you burn it, there is probably some one out there who will love it!
Finishing:
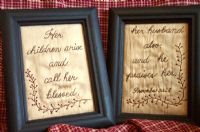
Now you can frame it...sew it into a pillow...or if it's small enough, blanket-stitch some homespun to the back and tie a jute hanger to it for a prim ornie!!
HOW TO MAKE A PILLOW:
Cut 4 strips of homespun about 2-3 inches wide and 2-34 inches longer than finished stitchery width/length. Sew to edges of stitchery leaving about 1/4 to a half inch or so space from stitching. Lay on chosen backing fabric right sides together and cut backing fabric to fit. Sew together leaving an opening about 3 inches for turning and stuffing. Turn and stuff firm and stitch closed. There you go!! Finished and ready for compliments!!
Please remember to give credit where credit is due...if you post pics online or sell your finished product on a web-site, ebay...wherever~artists really do appreciate you giving them credit as the designer. And remember although you buy a pattern, the designer still owns their original work...so no photocopying or forwarding the patterns via email. When in doubt just ask the designer...we are all pretty easy to get along with...most of the time *wink*!
Please feel free to email me with any questions...I'd love to help you!
CINDER IS OFFERING A SPECIAL TO ALL MY BLOG READERS ON HER PATTERN SIGHT...THRU THE END OF FEBRUARY BUY ONE PATTERN GET ONE FREE!! JUST TYPE "MEGAN'S BLOG" IN THE NOTES!
BLESS MY STITCHES